Absence management helps employers minimize unexpected absences and maintain high productivity. Zenyo Workforce ensures the smooth management of absences and workflows, enhancing overall operational efficiency.
How to Manage Absence Settings?
Absence management is essential for tracking employee leave and ensuring smooth operations.
- Click on the Settings icon and select the Absence Management menu.
- The Absence Management menu includes two submenus:
- Calendar
- Types and Policies
Create a Calendar
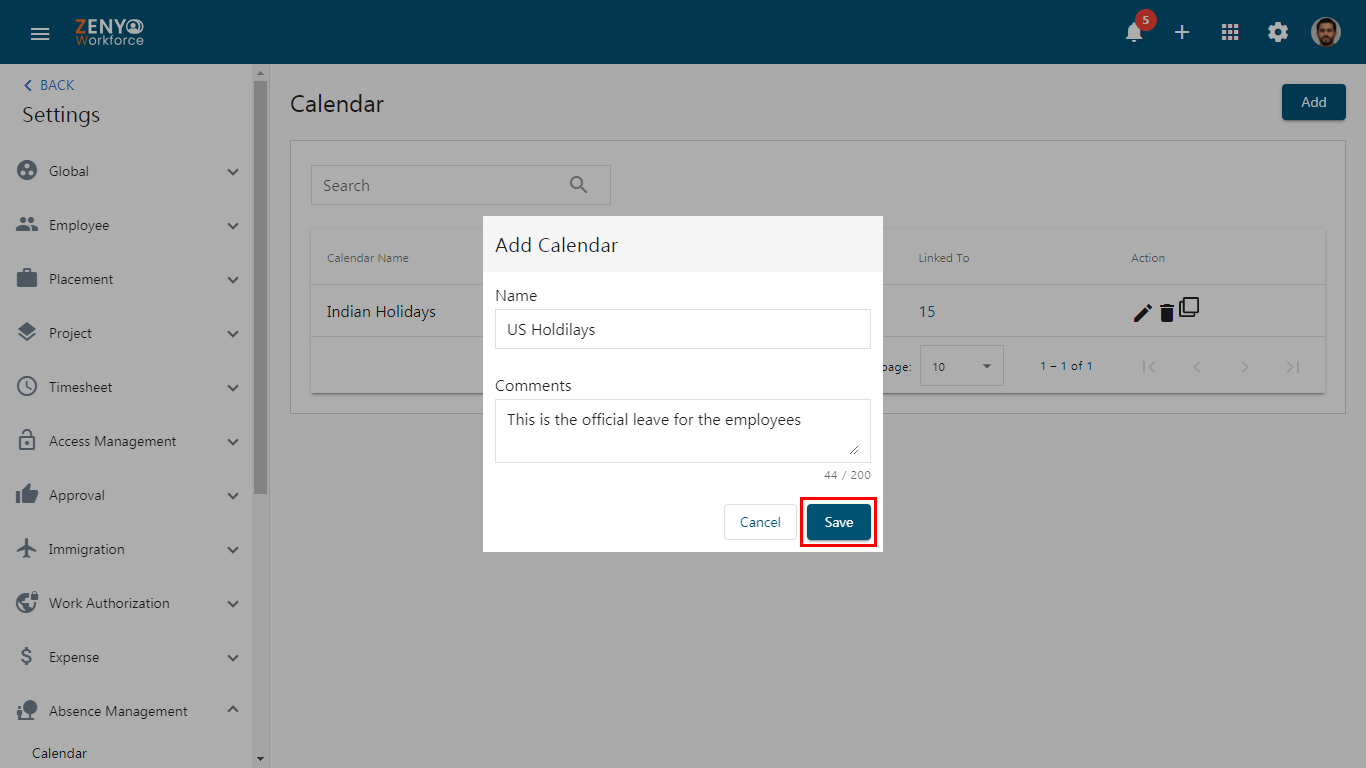
- Click on the Calendar sub-menu. To add a new calendar, click the Add button.
- In the pop-up box, enter the calendar name, add a comment if needed, and click Save. The calendar has been saved and is now listed.
Set Holidays in the Calendar
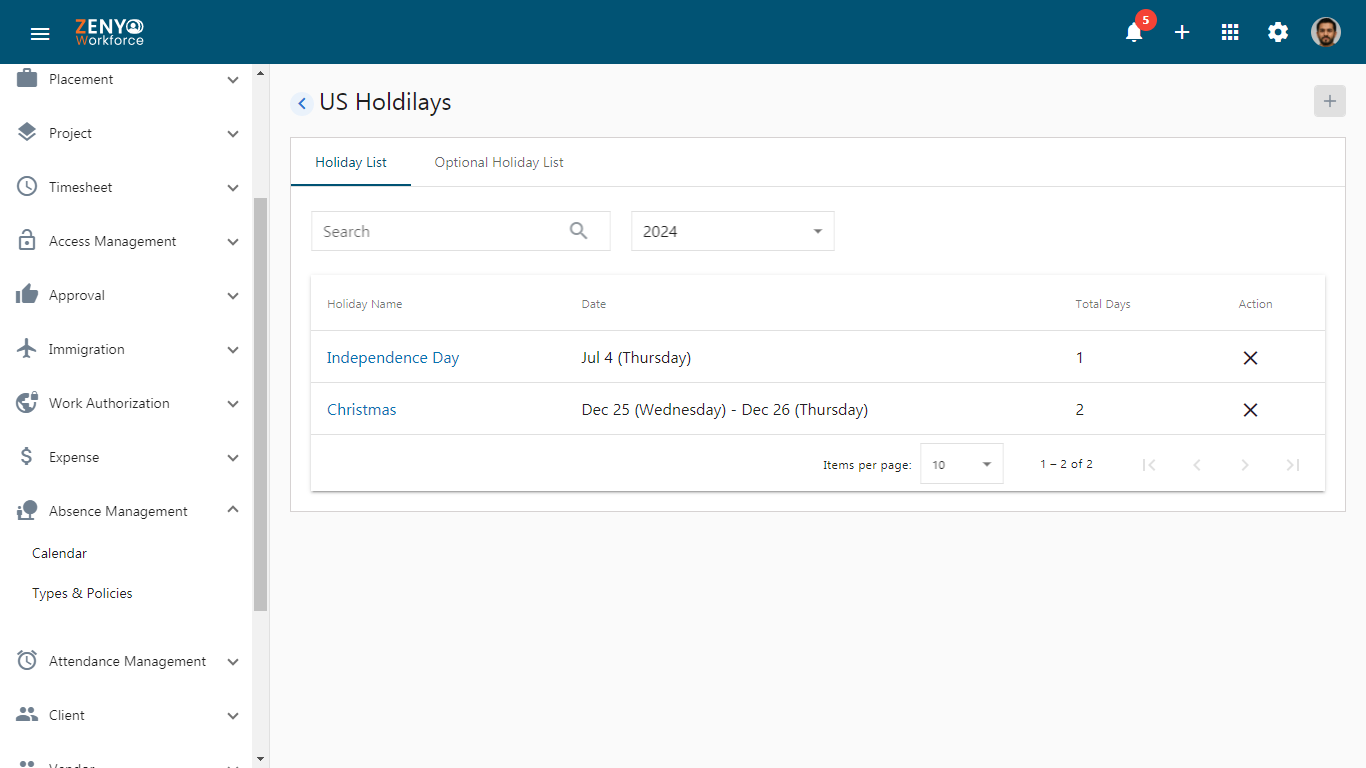
- To create a holiday for the calendar, click on the record, which will redirect you to the Holiday List tab.
- Click the Add icon to create a new holiday.
- Enter the holiday name, start date, and end date, then click Save. The newly added holiday will appear in the list.
- Repeat these steps to add multiple holidays as needed.
- Search for Holidays. Use the search bar to find specific holidays and filter them by year.
- Under the Action column, to make a holiday inactive, click the Inactive icon. If you want to reactivate an inactive holiday, click the Active icon.
Optional Holiday List
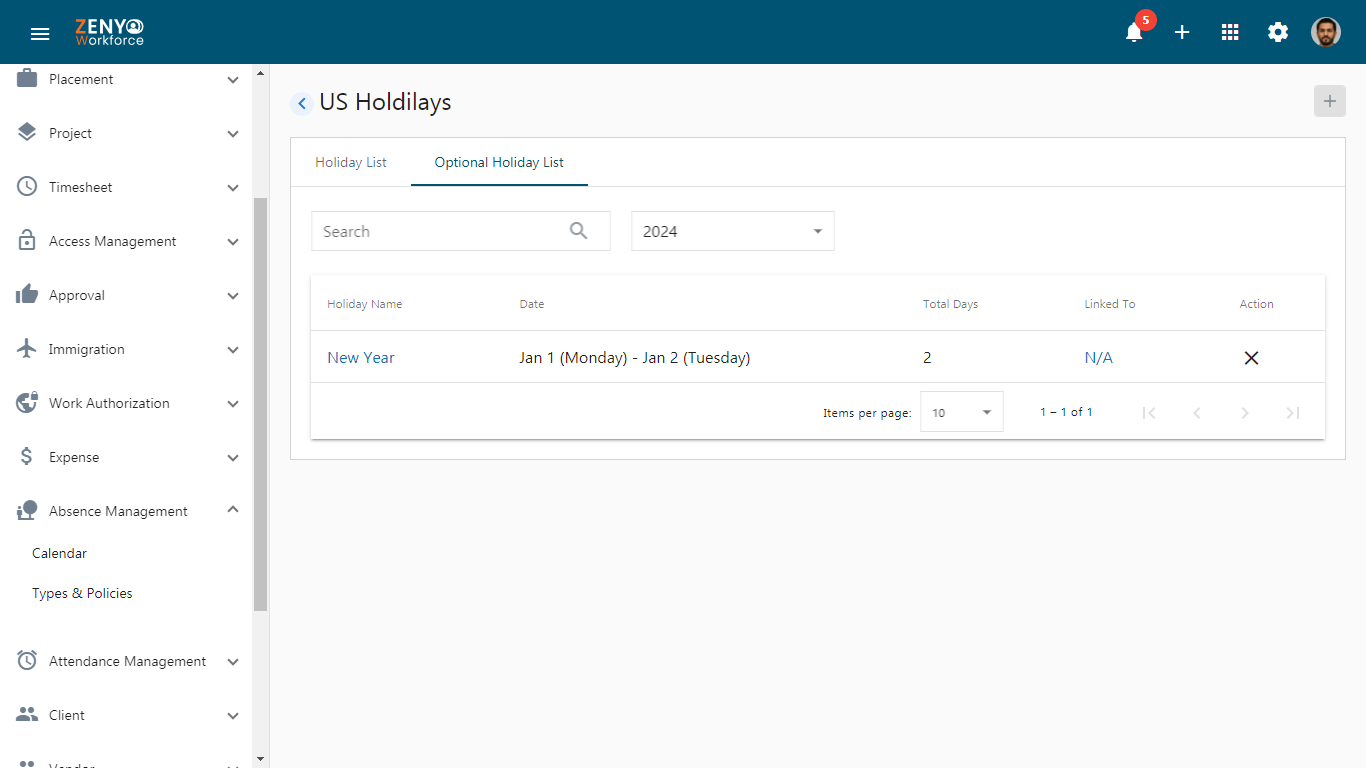
- Navigate to the Optional Holiday List tab.
- To add a new optional holiday, click the Add icon.
- In the pop-up box, enter the holiday name, set the start and end dates, and click Save.
- Your optional holiday has now been added to the list.
- Under the Linked To column, click on the N/A. This is because no employees have been added yet. After clicking, a dialog box will appear. Click the Add Employee button to add employees to the optional holiday.
Assigning Employees to the Calendar
- Under the Linked To column, it will initially show N/A because no employees have been added yet, as this is a new calendar.
- You can assign an employee to the newly created calendar on the Employee Information page.
- After assigning an employee to this calendar, you will see the number of employees displayed here.
- You can edit the calendar name using the Edit icon.
- To delete the calendar, use the Delete icon.
- If you need to clone the calendar, you can do so using the Clone icon.
Creating Leave Types and Setting Policies
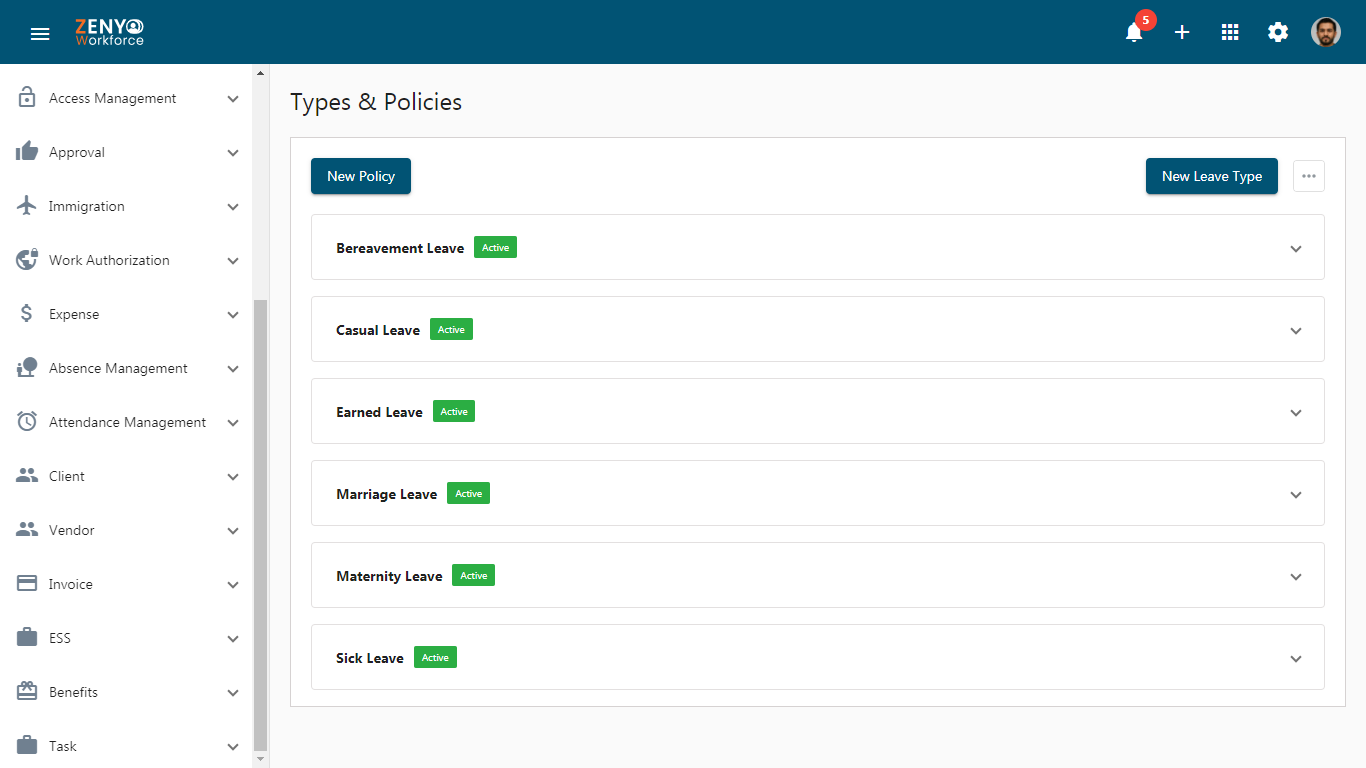
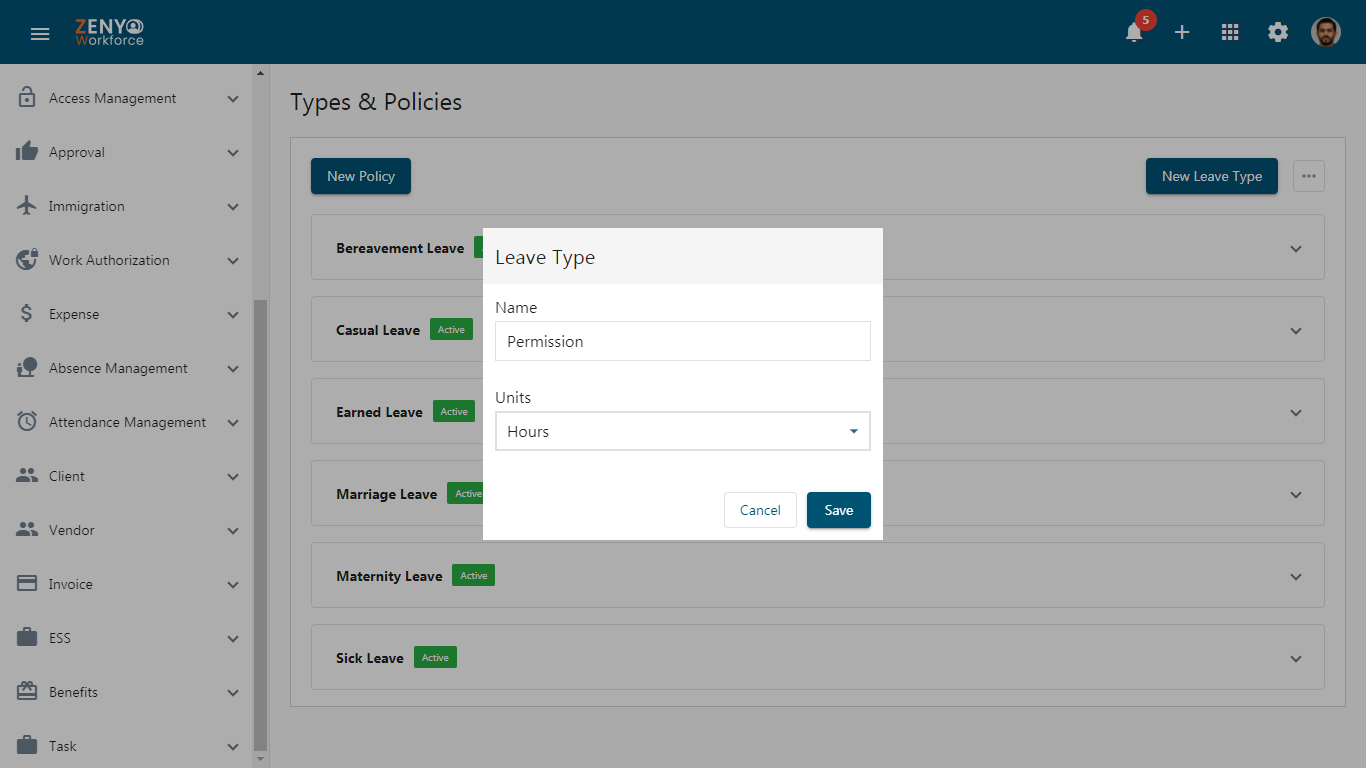
- Click on the Types & Policies sub-menu, to create a new leave type. Click the New Leave Type button.
- Enter a name for the leave type, choose whether to track it by hours or days, and click Save.
- Repeat these steps to create more leave types.
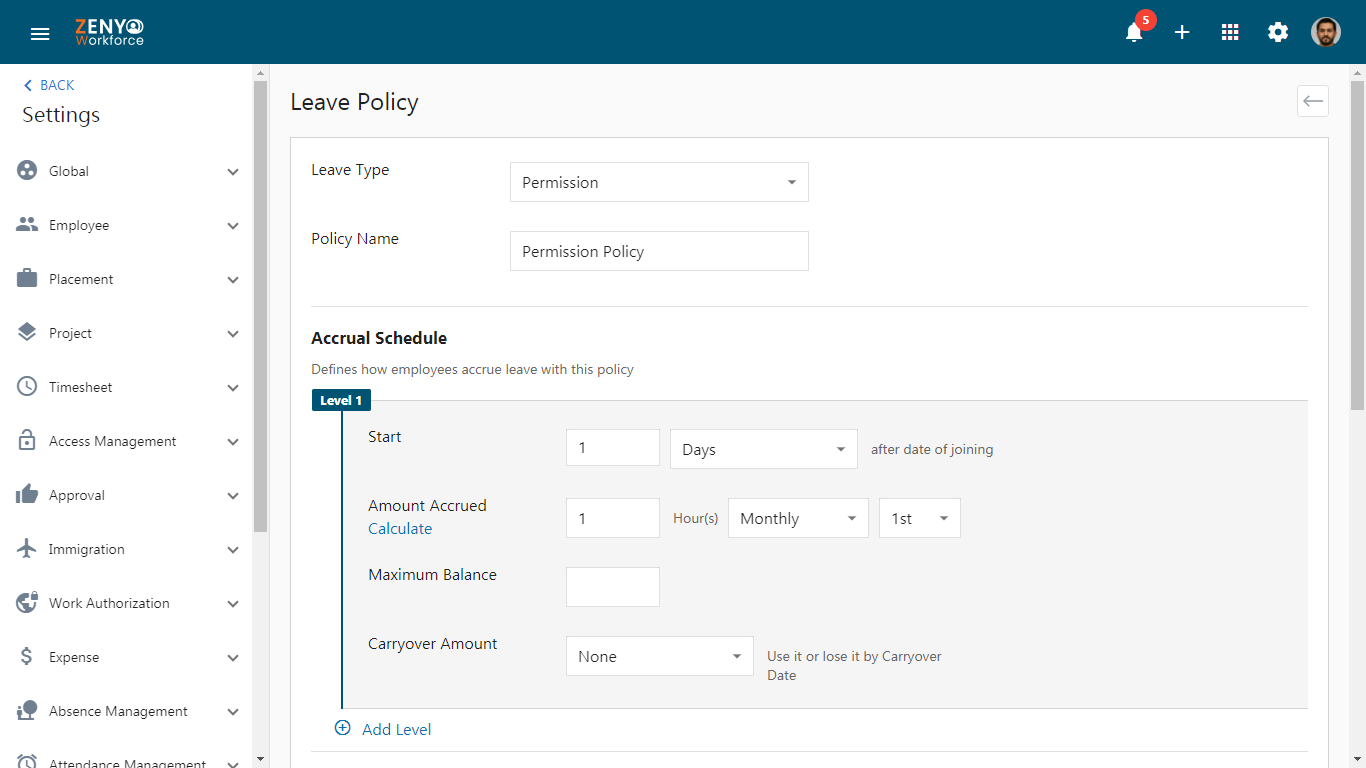
Set a Leave Policy
- After creating a leave type, click the New Policy button or select Create a Policy under the leave type to go to the Leave Policy page.
- Set the Count for when accrual starts (e.g., 0 days for immediate accrual).
- Choose the Start period (Days, Weeks, Months, or Years) to set how employees will earn leave.
- Set the number of leave days or hours and choose how often they are credited (Daily, Weekly, Monthly, etc.,)
- Use the calculate option to determine leave days based on the chosen accrual frequency. If yearly total leave days are provided, the option calculates the corresponding leave days for the selected frequency.
- In the Maximum Balance, enter the number of leave days allowed for the employee as a limit. For example, if 10 days is set as the maximum balance, the employee will accrue leave up to 10 days from January to October. Once this limit is reached, no additional leave will be credited. This means that in November, the employee will not receive any more leave credits.
- The Carryover Amount determines whether unused leave from the previous year will carry over into the new year.
- If you select None, any remaining leave balance will not be carried over to the next year.
- If you select Up to, you can specify the number of leave days that can be carried over. Any leave beyond that limit will not be transferred.
- If you select Unlimited, all unused leave from the previous year will be carried over, regardless of the amount.
- Click Add Level to define and manage leave policies by automatically adjusting entitlements as employees progress through hierarchical levels, ensuring leave policies follow predefined rules for each level.
- In the Accrual Options section,
- The First Accrual section has two options: Prorate and Full Amount.
- Prorate indicates that their leave is calculated based on the days worked when an employee joins in the middle or at the end of the accrual frequency period.
- Full Amount indicates that if an employee joins on any date within the accrual frequency, they will accrue leave without restrictions.
- In the Accrual Happens section, select when the accrual occurs: either at the beginning or the end of the period. If you choose
- At the beginning of the Period, leave will be added to the employees’ accounts on the first date of the chosen timeframe.
- If you select At the end of the Period, leave will be earned or added to the employees’ accounts on the last date according to the selected timeframe.
- The Level Transition Happens allows organizations to manage leave policies by automatically adjusting entitlements based on employee levels within the hierarchy.
You have two options for managing employee levels:- Immediately: When an employee’s leave level changes, updated entitlements are applied immediately, recalculating the leave balance to ensure eligibility for correct benefits.
- At the End of the Period: When an employee’s leave level changes, the updated entitlements are applied at the end of the current leave level period. Changes in leave entitlements based on the new level will take effect at the upcoming leave period.
- In the Carryover Date, you can set the date when the employee’s leave will carry over to the next year. You can choose options like January 1st, the employee’s hire date, or a specific date. Based on this setting, the leave will be carried over accordingly.
- The First Accrual section has two options: Prorate and Full Amount.
- In the Others section, click on the Payable Leaves checkbox to indicate that the selected leaves are considered paid leave.
- Click on the Weekends shall be considered as leaves checkbox if weekends should also count as leave days. For example, if an employee takes leave from Wednesday to Monday, Saturday and Sunday will be counted as leave days if this option is selected.
- In the Leave Should Be Applied section, if you select Before Leave Day, enter how many days in advance the leave should be applied. If you select After Leave Day, enter how many days after the leave day the application should be submitted. This sets a limit on how early or late leave can be applied.
- In the Maximum Stretch section, set the maximum number of leave days or hours that can be taken consecutively.
- Finally, click Save.
Manage Leave Type and Policy
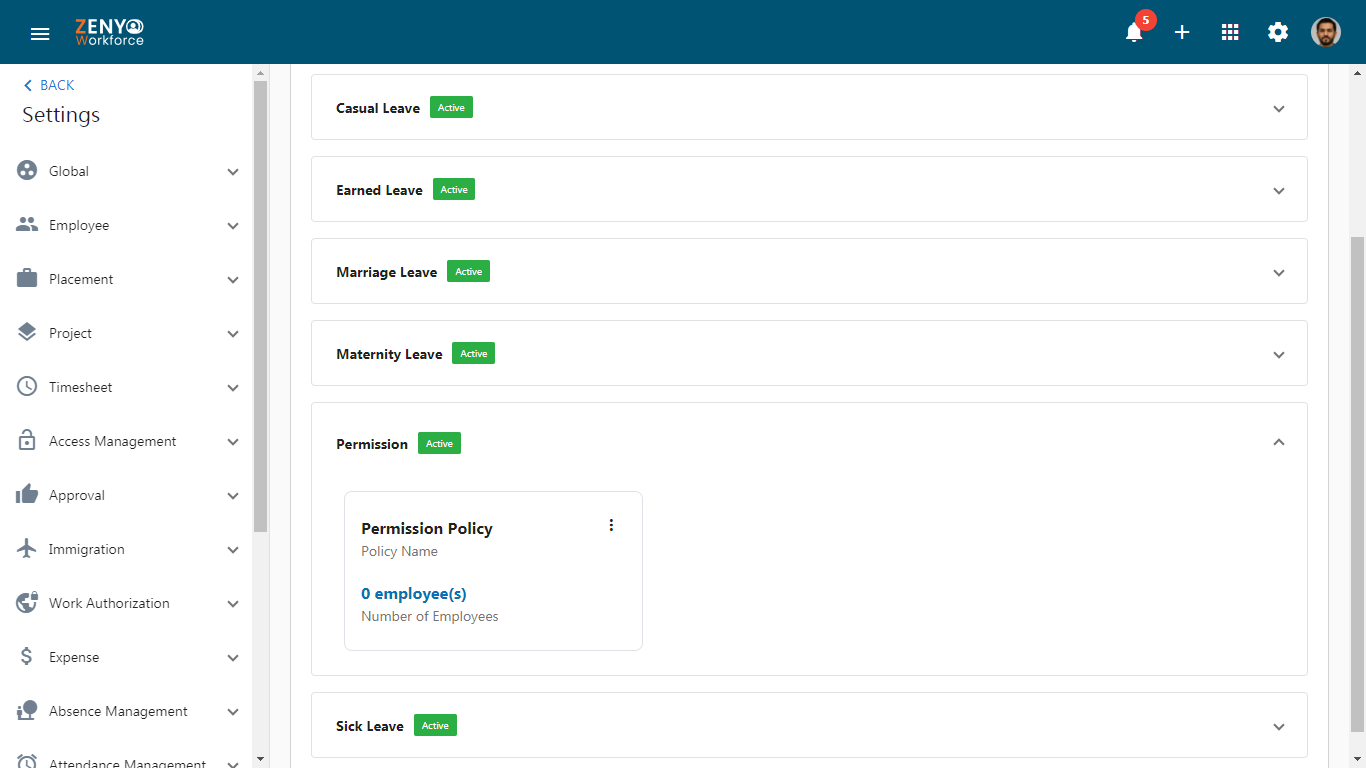
- Go back to the Types & Policies page to view the created leave policy.
- You can deactivate a leave type by toggling the switch off. Click on the edit icon to modify the leave type name and units. Click on the delete icon to remove the leave type.
- To view the assigned leave policy for a specific leave type, click the drop-down arrow. If you wish to edit, clone, or delete the policy, select More Options in the leave policy section.
Assign Employees to a Leave Policy
- Click on the Number of employees(count) link to assign employees to this policy.
- Assign the leave policy to All Employees or filter by location, department, role, or employment type.
- To assign specific employees, select the employee, click the right arrow, set the accrual start date (hire date or specific date), and click Save.
Set Default Week Hours
Click the More Options icon near the New Leave Type button, select Default Week Hours, set the work hours and week off days, and click Save.
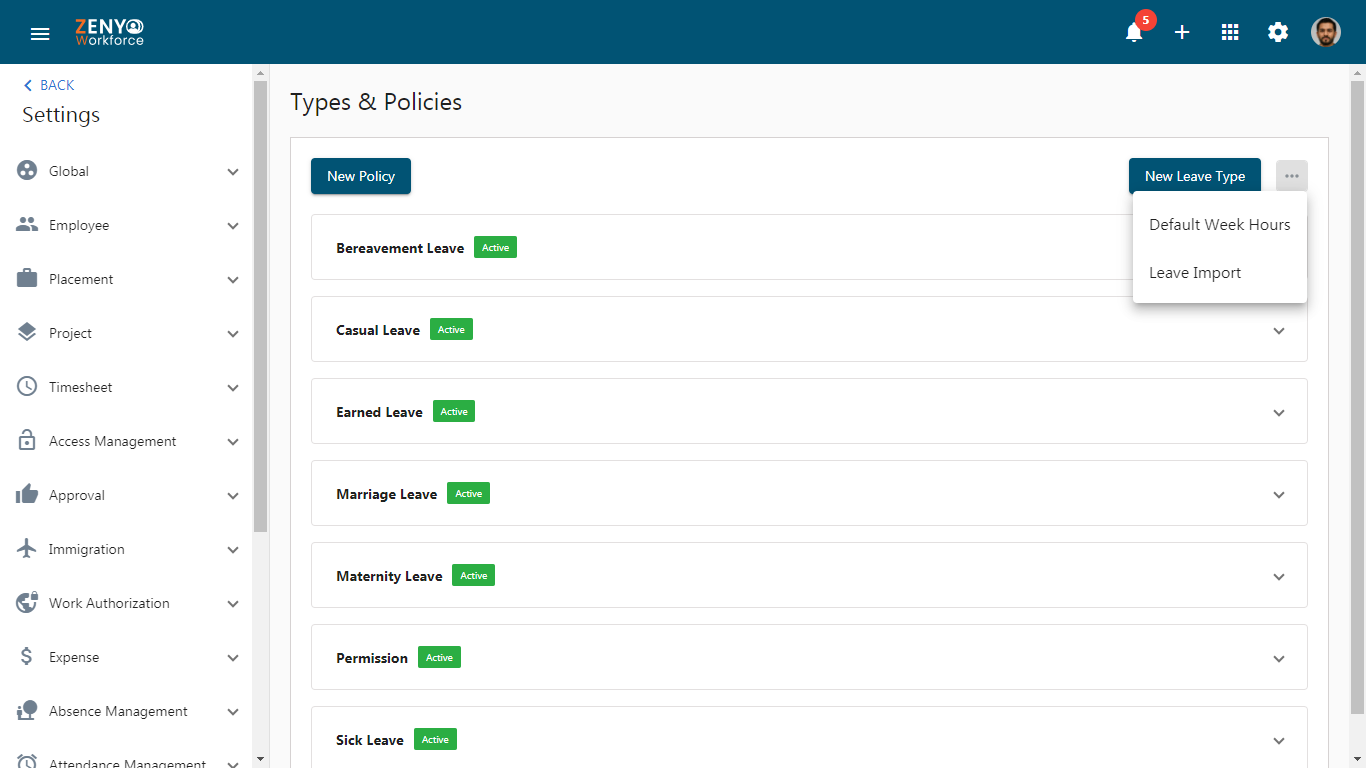
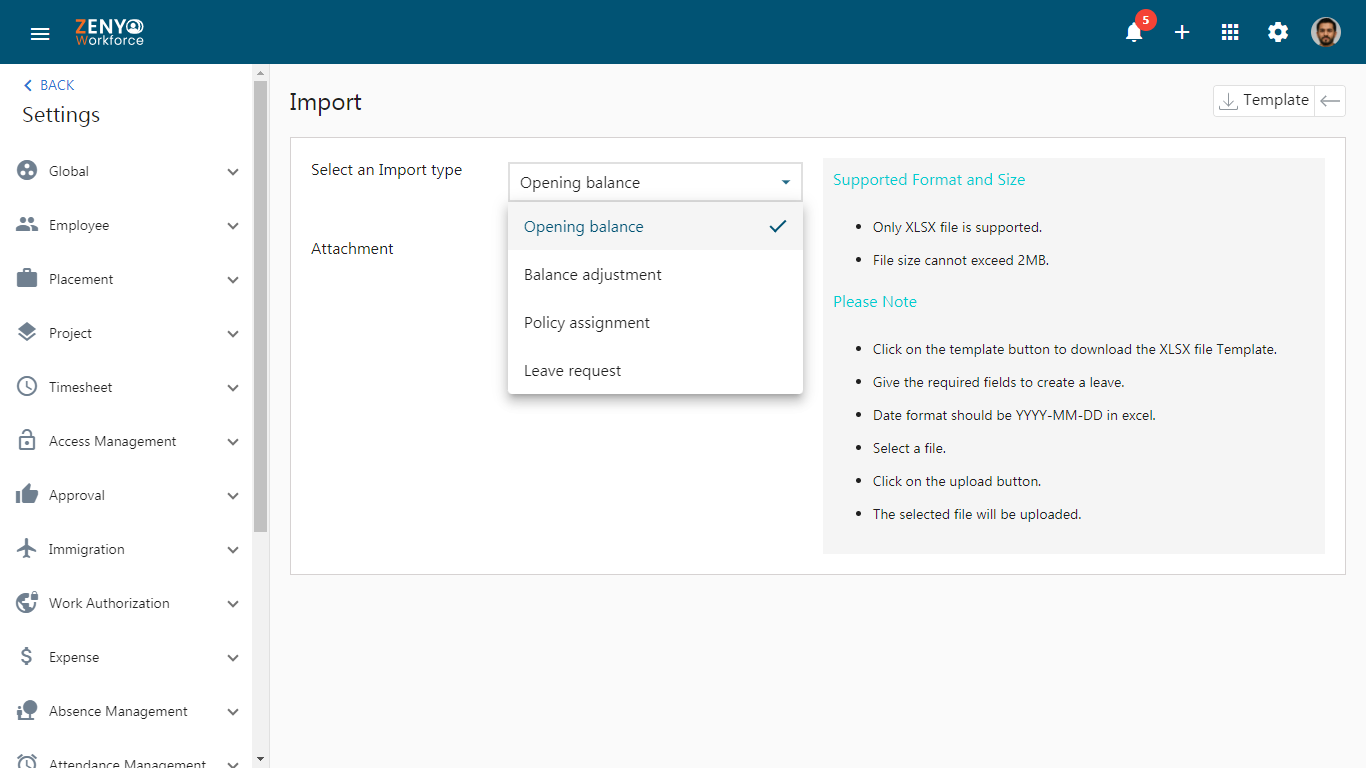
Leave Import
In the Leave Import section, there are four options available:
- Opening Balance
Download the template to enter the opening leave balances for all employees. Once completed, attach the file and click Upload. - Balance Adjustment
To adjust leave balances for selected employees, download the template, enter the data, attach the file, and click Upload. - Policy Assignment
To assign leave policies to selected employees, download the template, enter the necessary data, attach the file, and click Upload. - Leave Request
Download the template to enter all employee leave requests. After entering the data, attach the file and click Upload.
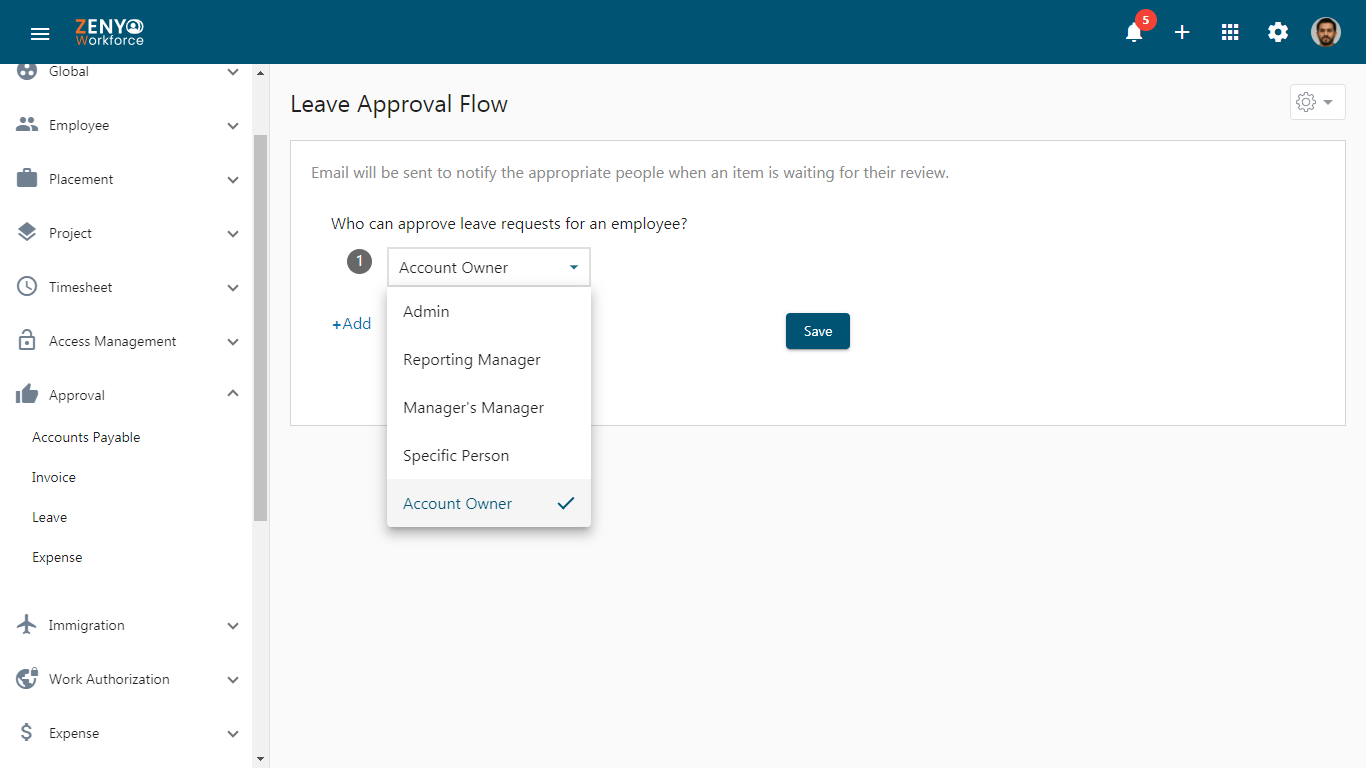
Leave Approval Flow Setup
- Click on the Settings icon.
- In the Approval main menu, select the Leave sub-menu.
How to Set Default Level Approvals?
- To set approvals at the default level, click on the dropdown menu under Who can approve leave requests for an employee?
- Select an approver from the available options, such as Account Owner, Admin, Reporting Manager, Manager’s Manager, or a Specific Person.
Note: Each role can only be chosen once, except for a specific person.
- If you choose a Specific Person, select a particular employee as the approver. You can remove added approvers by clicking the Remove icon.
- Click the Save button to apply the changes.
How to Set Advanced Approvals
To set up Advanced Approvals for Leave, follow the link.
