Employee offboarding is a critical process for organizations to ensure smooth and compliant transitions when an employee leaves the company. This provides a step-by-step guide on how to effectively manage the offboarding process using Zenyo Workforce. It covers everything from initiating the termination process, handling offboarding tasks, managing pending responsibilities, and finalizing the release of employees.
How to Initiate Offboarding?
There are two options for initiating the termination process when offboarding an employee:
- Via Initiate Offboarding Action
- Via the Offboarding Tab
- Via Initiate Offboarding Action
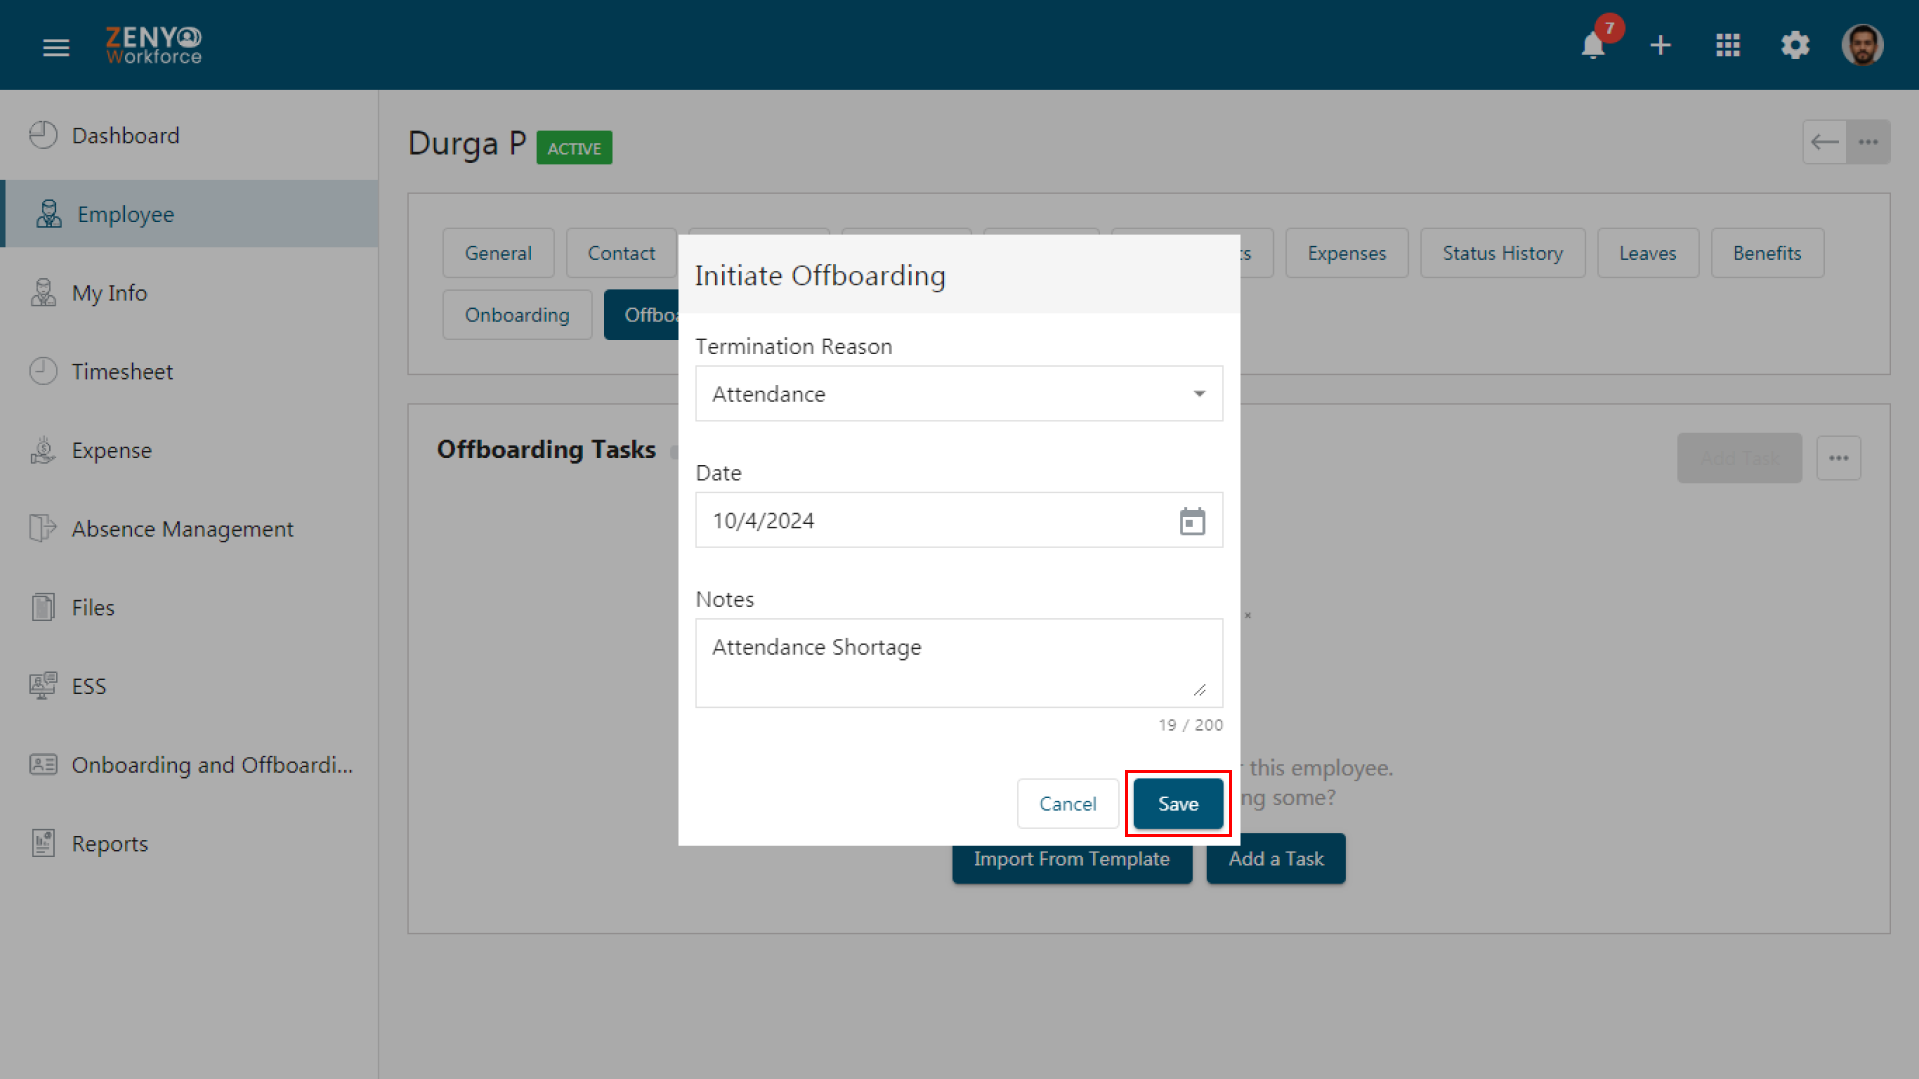
- Navigate to the Employee menu and select the specific employee.
- Click the More icon and select Initiate Offboarding to begin the process.

- A dialog box will appear. Select the termination reason from the dropdown in the Termination Reason field.
- Choose the date (notice date) using the calendar in the Date field. You may enter additional notes in the Notes field.
- Click the Save button.
- Once the offboarding is initiated, the employee’s status will change from Active to Notice Period.
- Via Offboarding Tab
- Navigate to the specific employee in the Employee menu and select the Offboarding tab.
- Two buttons will appear: Import From Template and Add a Task.
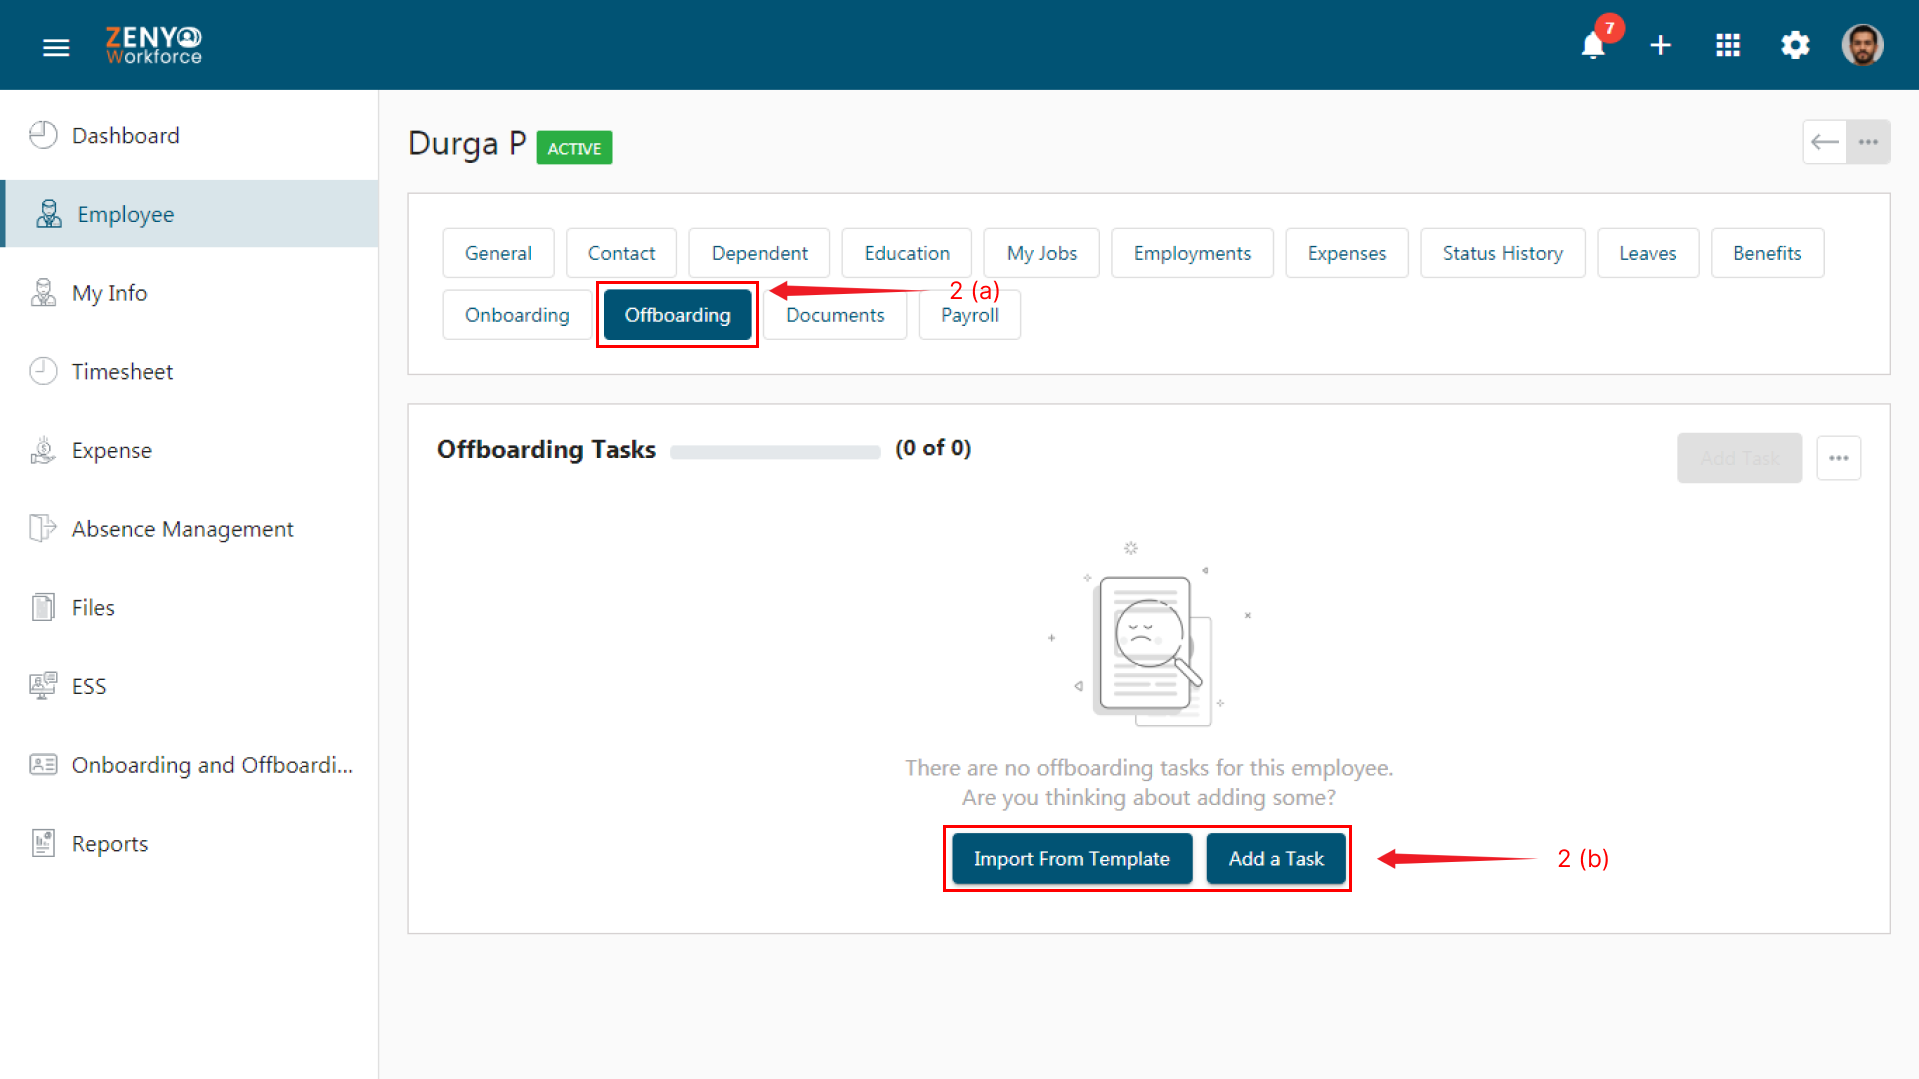
- If you choose Import From Template, the Initiate Offboarding dialog box will appear. Complete the necessary details and click Save. All the tasks applicable for this employee, based on the ‘Required for’ option set in the offboarding task settings will be imported to the employee’s offboarding page.
- You can add new tasks by clicking Add a Task or Add Task buttons and entering the relevant details.
- Via Initiate Offboarding Action
Additional Offboarding Actions
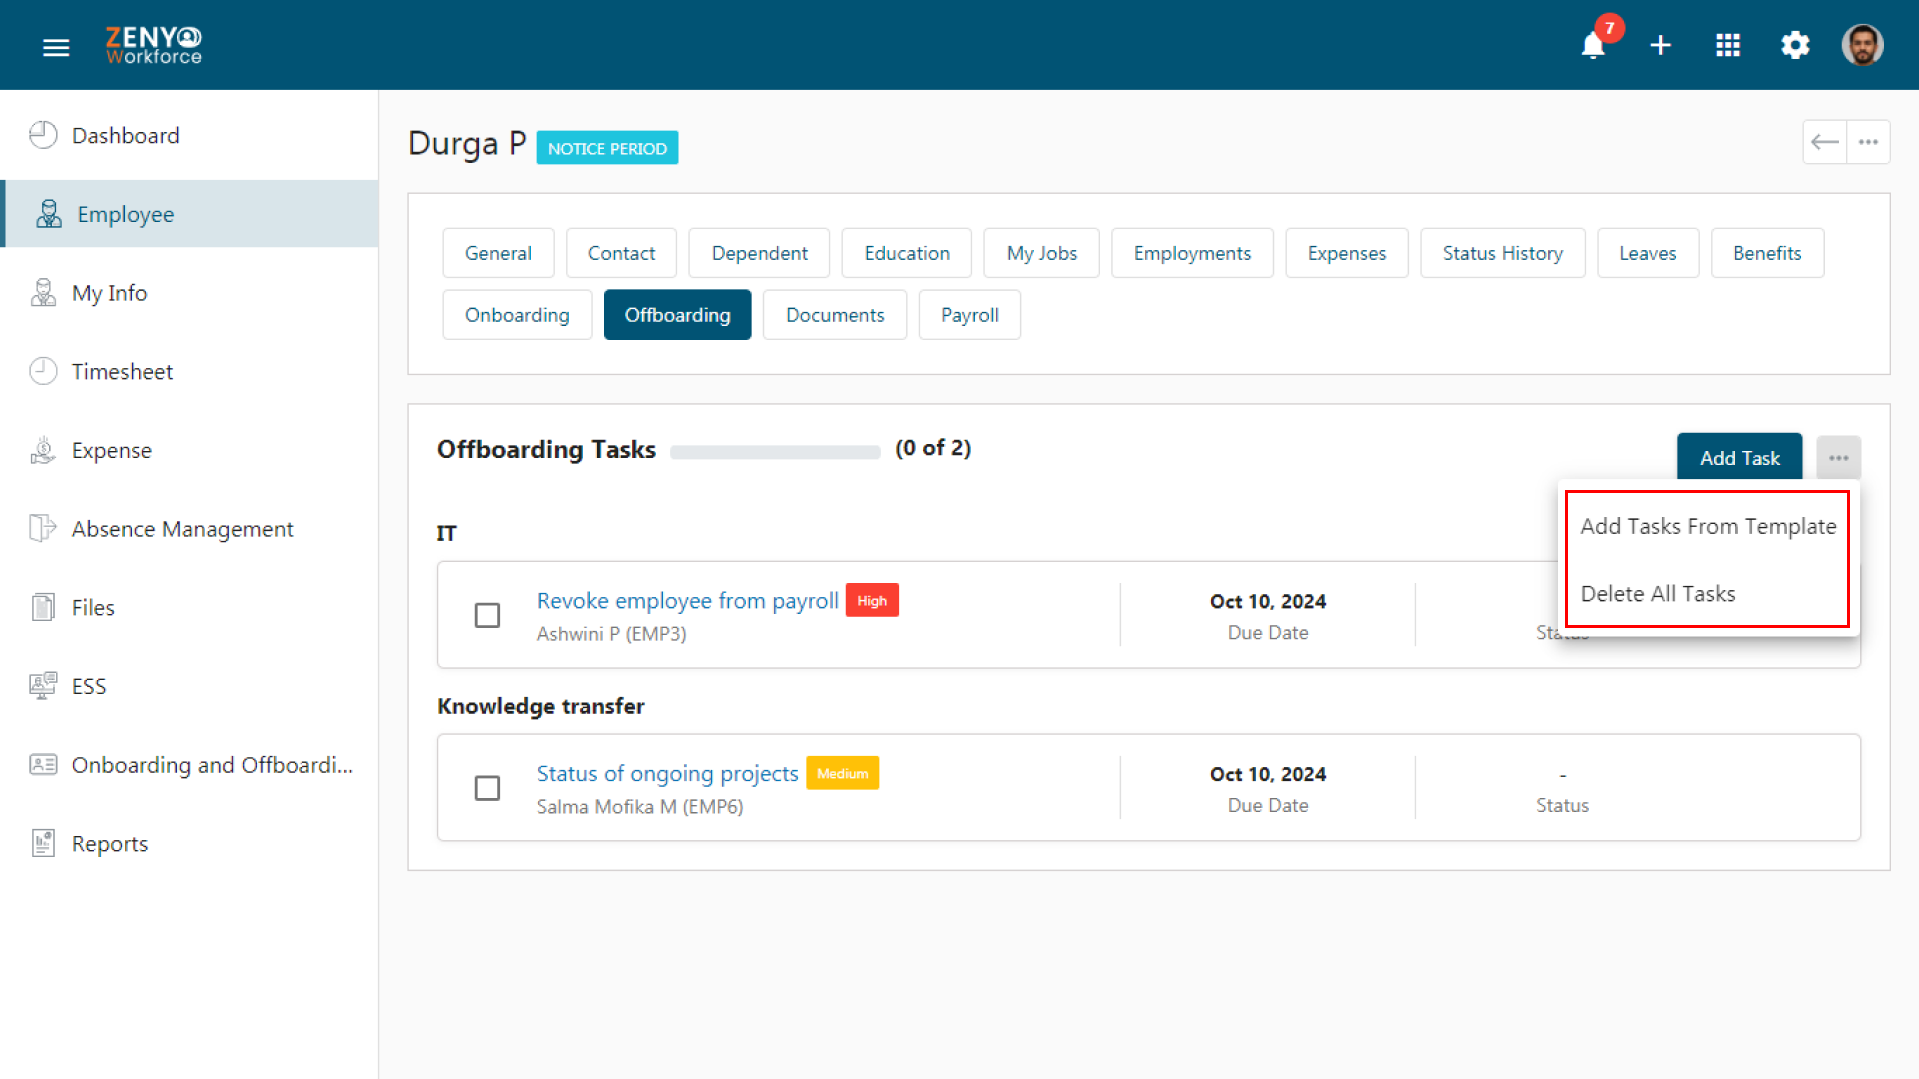
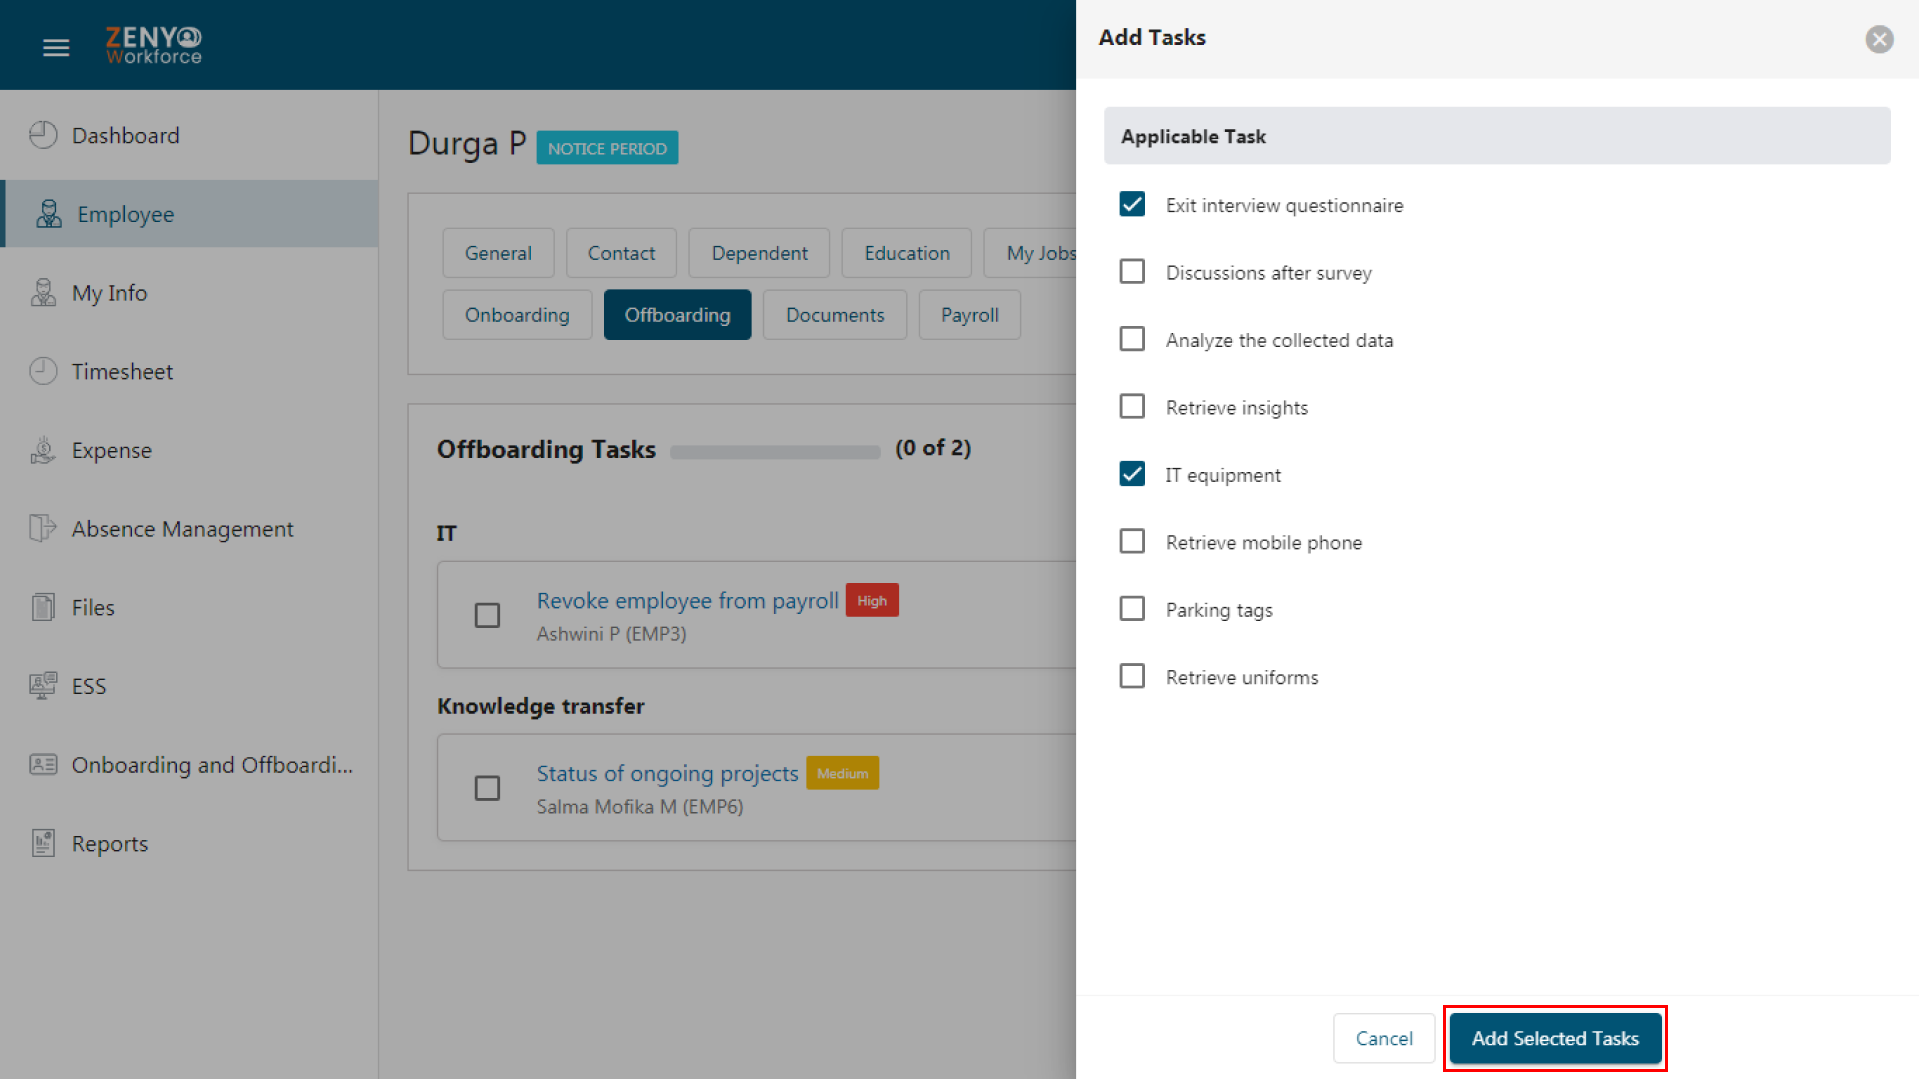
- Click the More icon to see options such as Add Tasks from Template or Delete All Tasks.
- When selecting Add Tasks from Template, a side panel will appear with two options: Applicable and Not Applicable. Select the tasks you want to add, and click Add Selected Tasks.
- When selecting Delete All Tasks, unfinished tasks will be removed. To delete completed tasks, check the box in the dialog box and click Delete These Tasks.
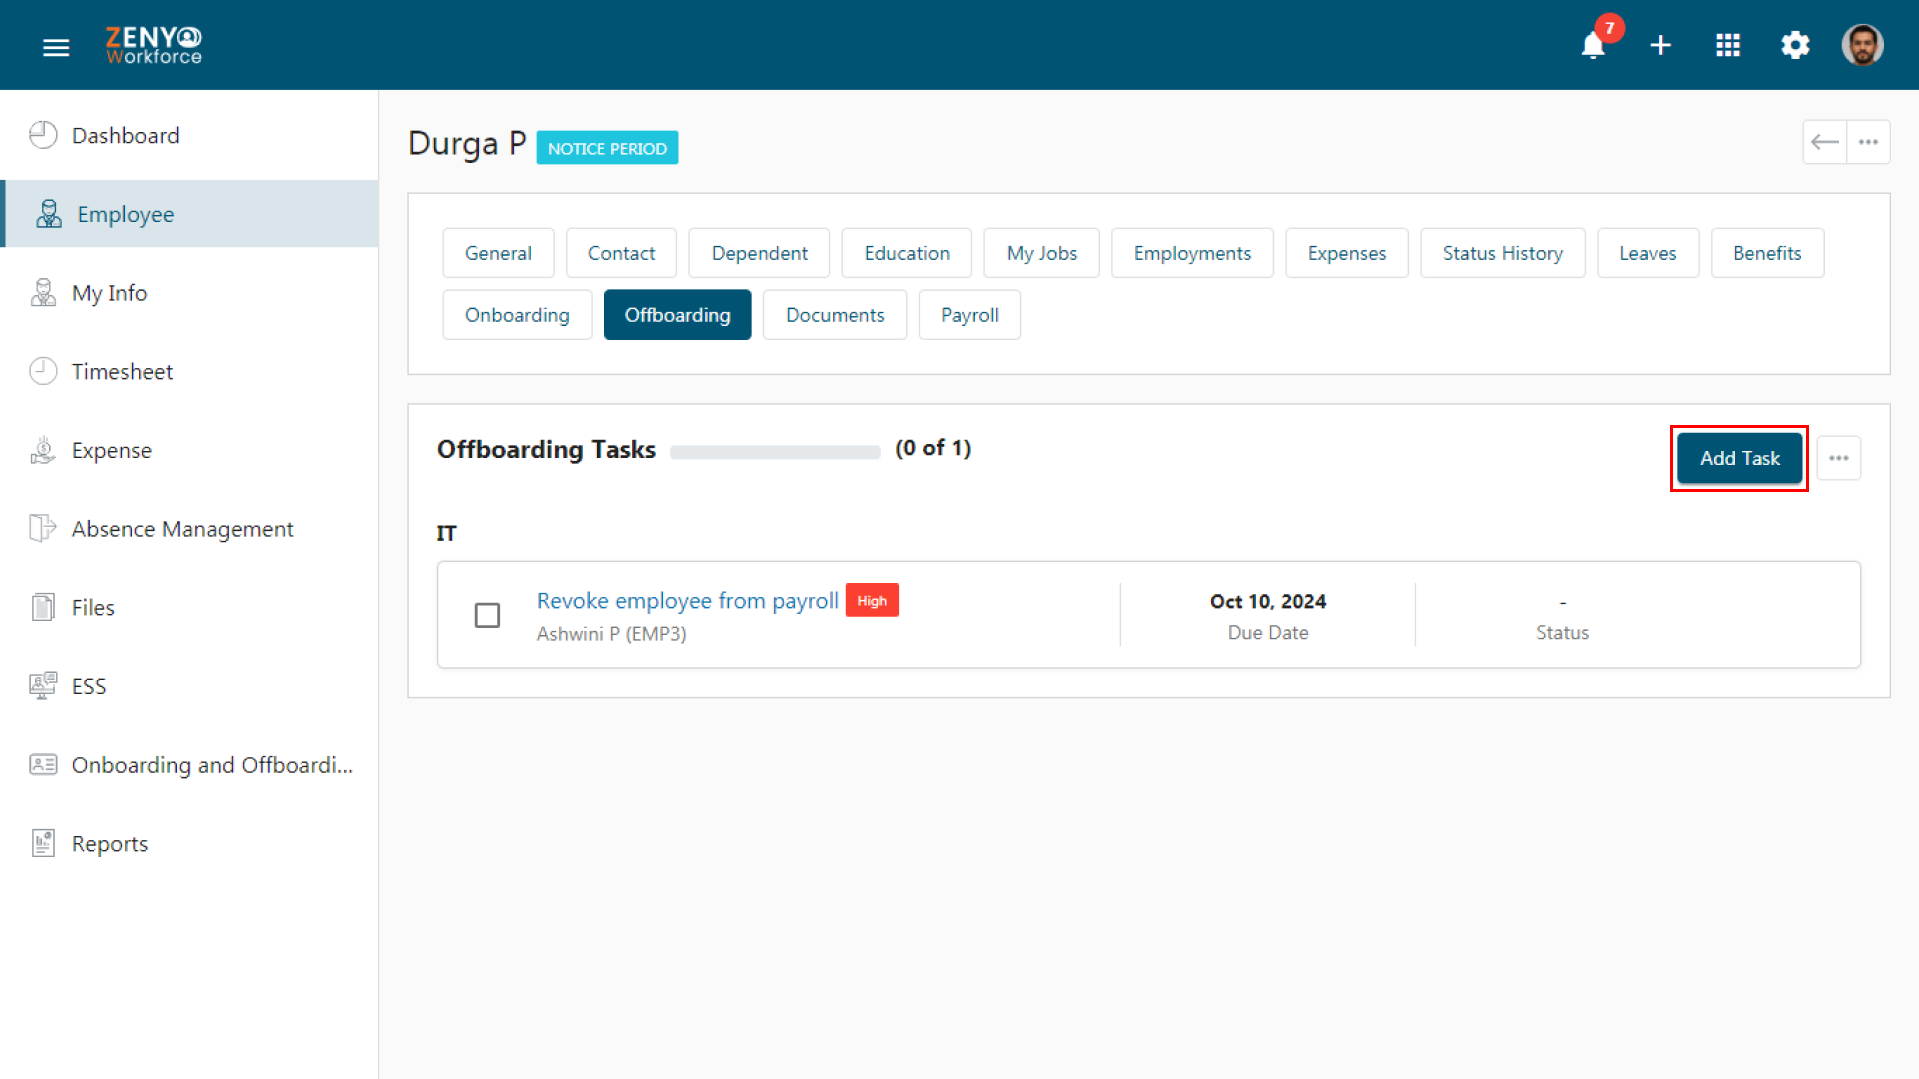
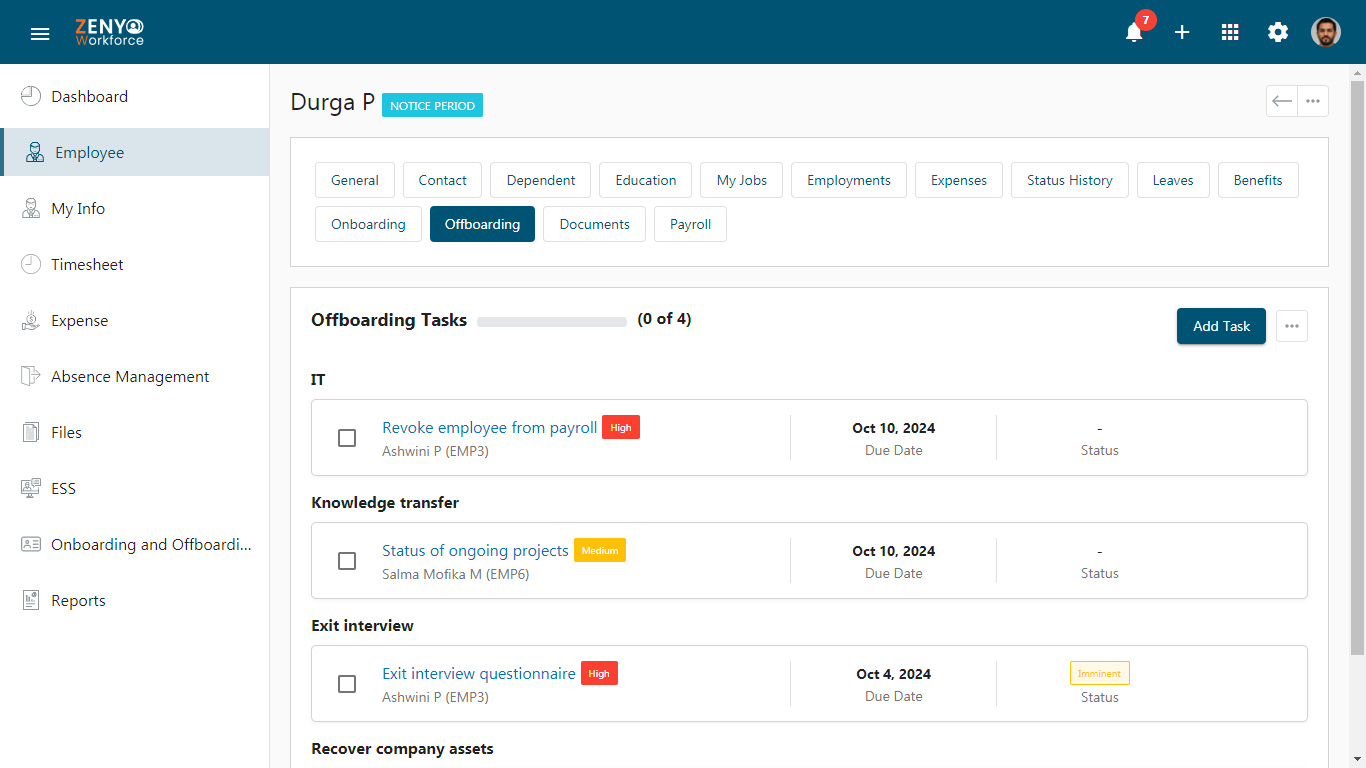
- In this section, the tasks are categorized and displayed with the task name, employee name, code, due date, and status.
- To delete a particular task, hover over the task and click the Delete icon. To edit a task, click the Edit icon.
- Clicking the task name will open a side panel showing the employee’s name, designation, priority level, and status.
- You can mark the task as complete by checking the box next to the task name. Documents attached to the task can be downloaded by clicking the Download icon, if available.
- Add comments and upload relevant documents by clicking the Attachment icon. After adding, click Submit.
- Click the document uploaded to download it, click the View icon to view the document, and choose More icon to Email or Download. Click the Delete icon to delete the document.
- Hover over the comment to Edit or Delete. You can also reply to the comment. A comment box icon will appear near the task name in the Offboarding Tasks section indicating the task has some comments.
- After completing a task, check the box next to the task name to mark it as completed.
- Click the More icon located in the top-right corner of the employee page, for the employee to Abort Offboarding.
Viewing Employees on Notice Period
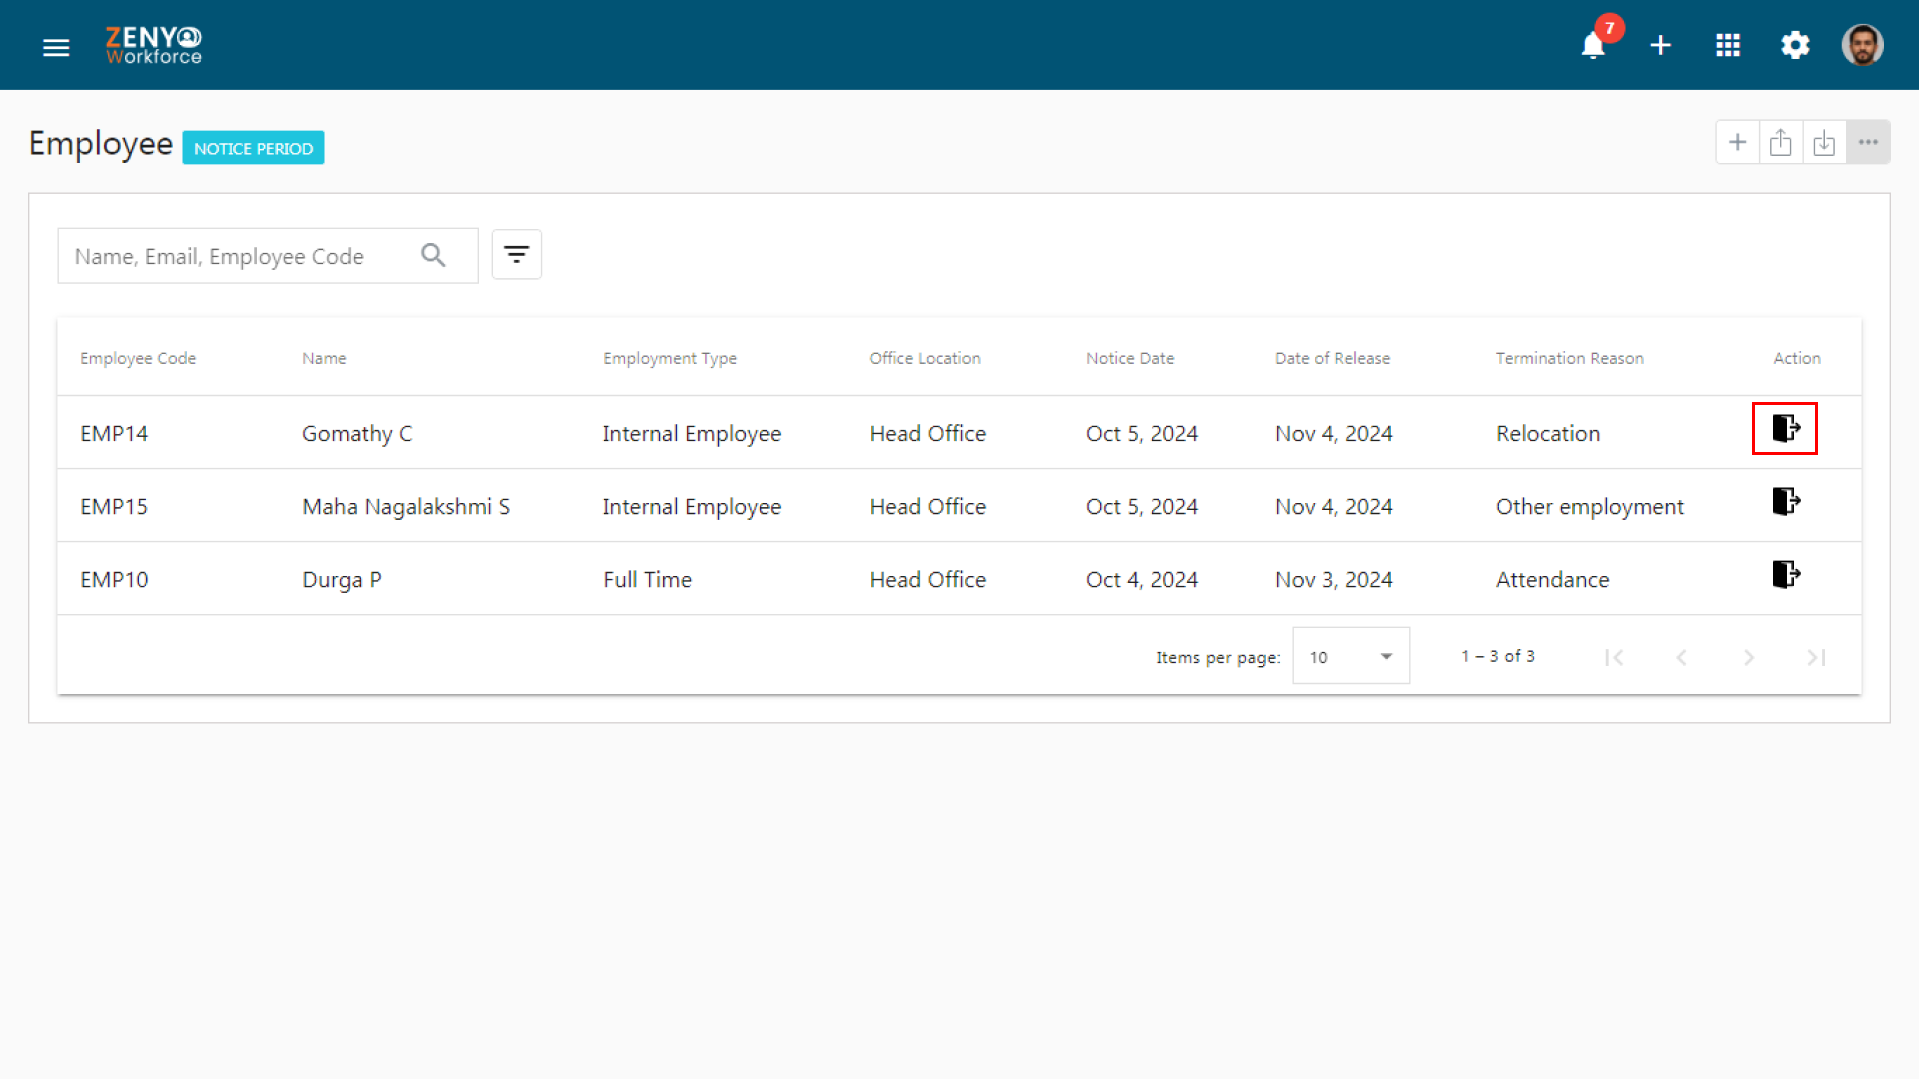
- To see employees in the notice period, go to the Employee menu, click the More icon, and select Notice Period.
- This page will show details such as Employee Code, Name, Employment Type, Office Location, Notice Date, Date Of Release, Termination Reason, And Action options.
- Click on the Offboarding Window icon under the Action tab to view the notice period details.
Offboarding Window
- The Notice Date and Termination Reason will appear in the Offboarding Window, as initially entered during the offboarding process. The Date of Release will automatically be set based on the notice period.
Note: The impact on reporting employee changes will only be reflected when the notice period employee is a reporting manager for at least one employee.
- You have three options for choosing the appropriate reporting manager
- Assign the reporting employees to the parent of this terminated / resigned employee - The manager working above the terminated employee is assigned as a reporting manager to the employees working below the terminated employee.
- Assign the reporting employees to the root of the organization - The people working under the terminated employee are assigned to the account owner.
- Replace terminated/resigned employee with another employee - In this option, you can choose a specific employee by using the drop-down to assign him/her as a reporting manager.

- In the Attachment section, you can add offboarding-related documents by clicking Choose File. Enter a title for the document and select the type from the dropdown. You can add new document types by clicking +Add Item. You can also add or remove extra files using the corresponding icons.
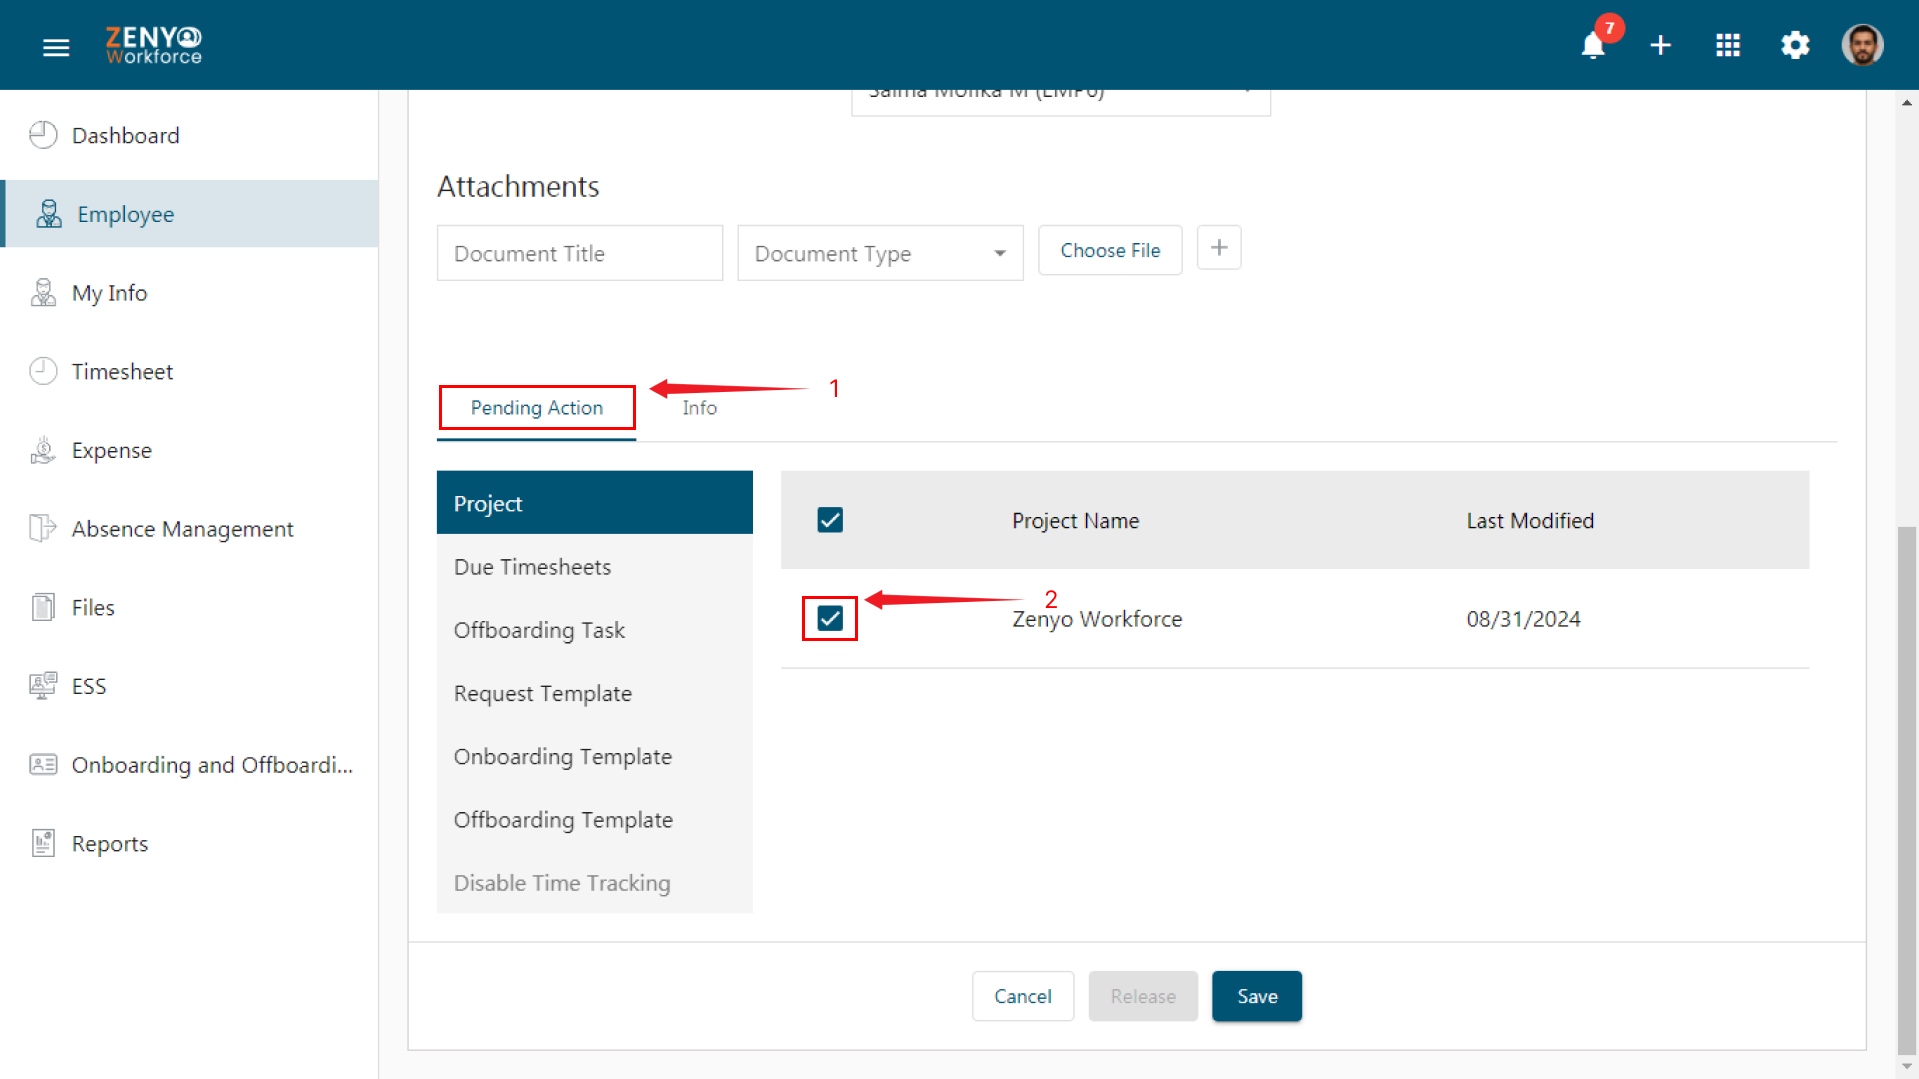
Pending Action & Info Section
At the end of the notice period, employees must be relieved of all their responsibilities. The Pending Actions tab lists assigned responsibilities under different categories.
- To remove an employee from their responsibilities, Select a category from Pending Actions.
- Check the box for the appropriate action and click Save to remove the employee from their responsibilities.
- Click the Skip icon under the Due Timesheets category to disable timesheets for the employee. Enter the reason in the dialog box and click Skip.
- Offboarding tasks are divided into two sections:
- Offboarding Tasks (Self): Tasks that are added and assigned to the notice period employee.
- Offboarding Tasks (Others): Tasks of other employees that are assigned to the notice period employee.
- To remove the notice period employee from the Offboarding, Onboarding, or Request templates, select the category, then choose another assigned person for that task from the dropdown.
- To Disable Time Tracking, enter the End Date on which the employee’s timesheet will end.
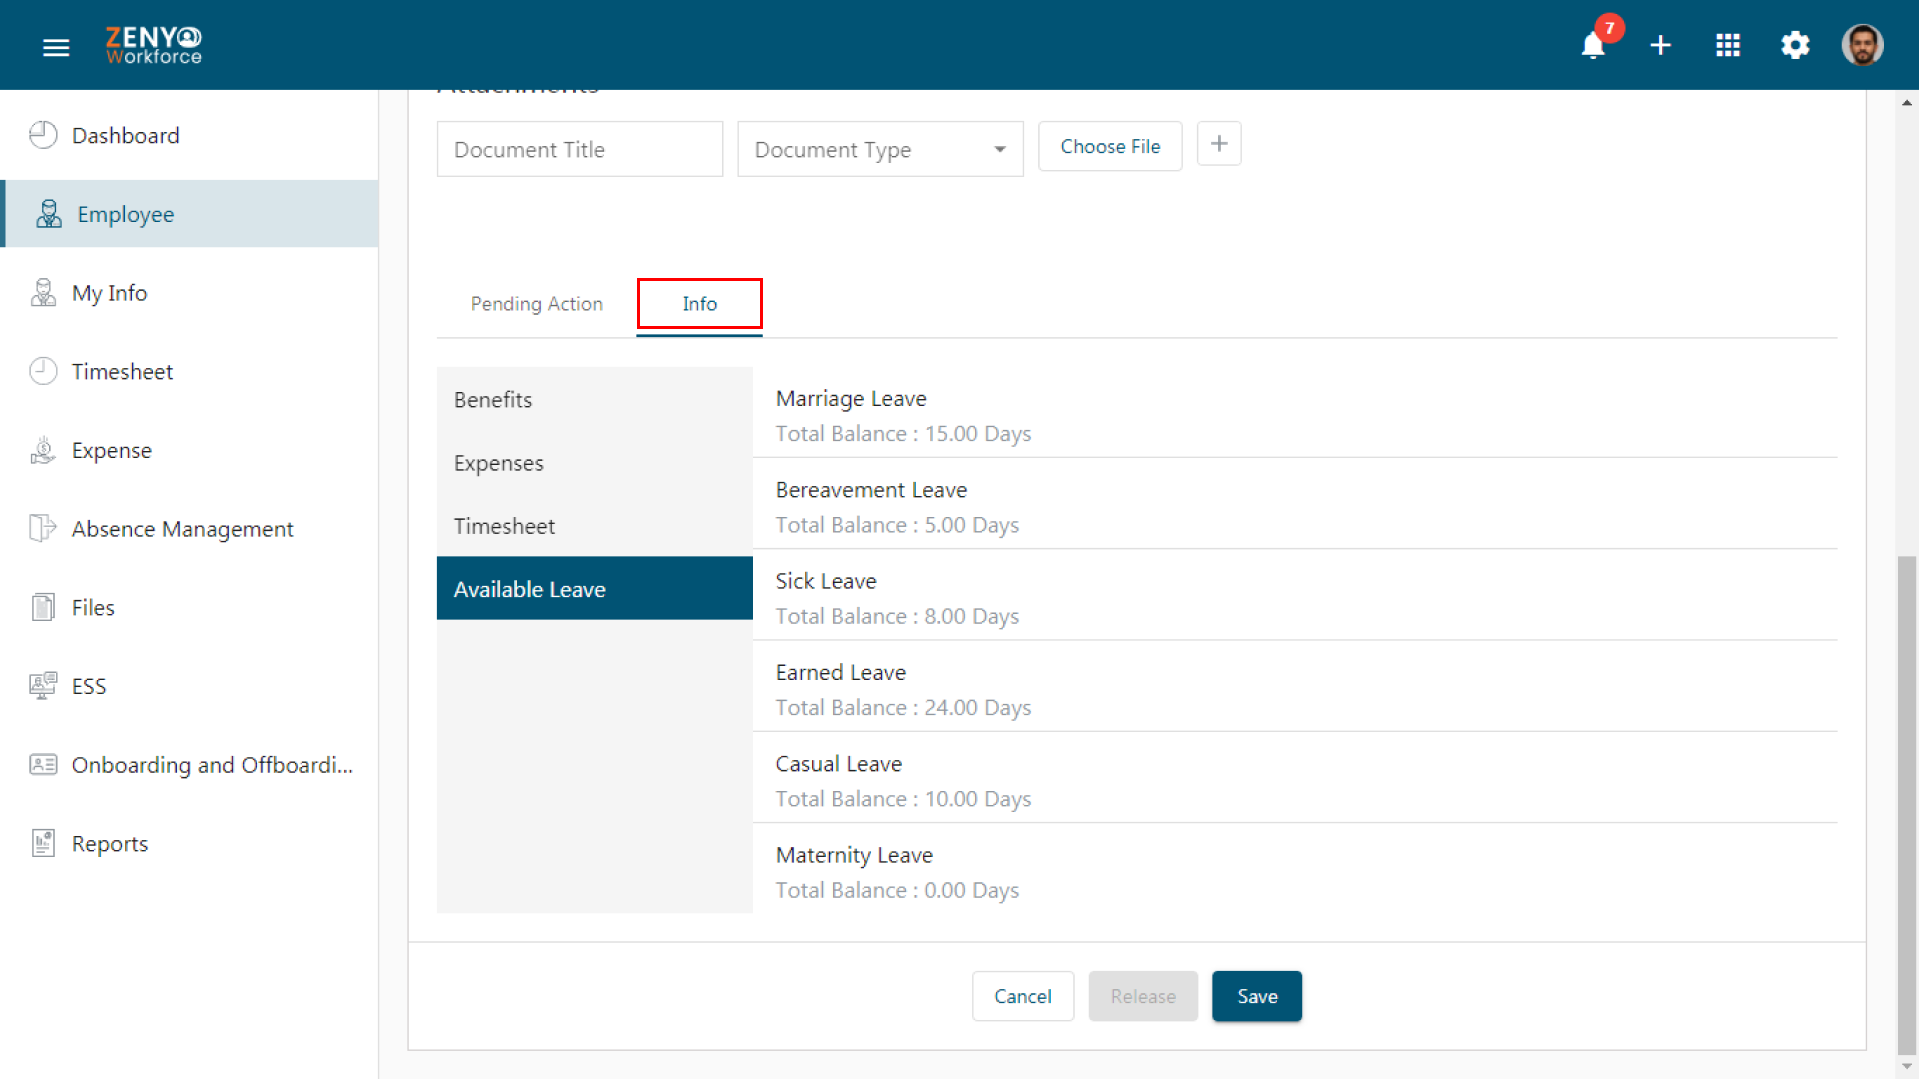
- The Info Tab provides detailed information about the employee, such as Sow, Benefits, Expenses, Timesheets, and Available Leave.
- Click the Release button to officially remove the employee from the organization. Once released, the employee’s status will change from Notice Period to Terminated.
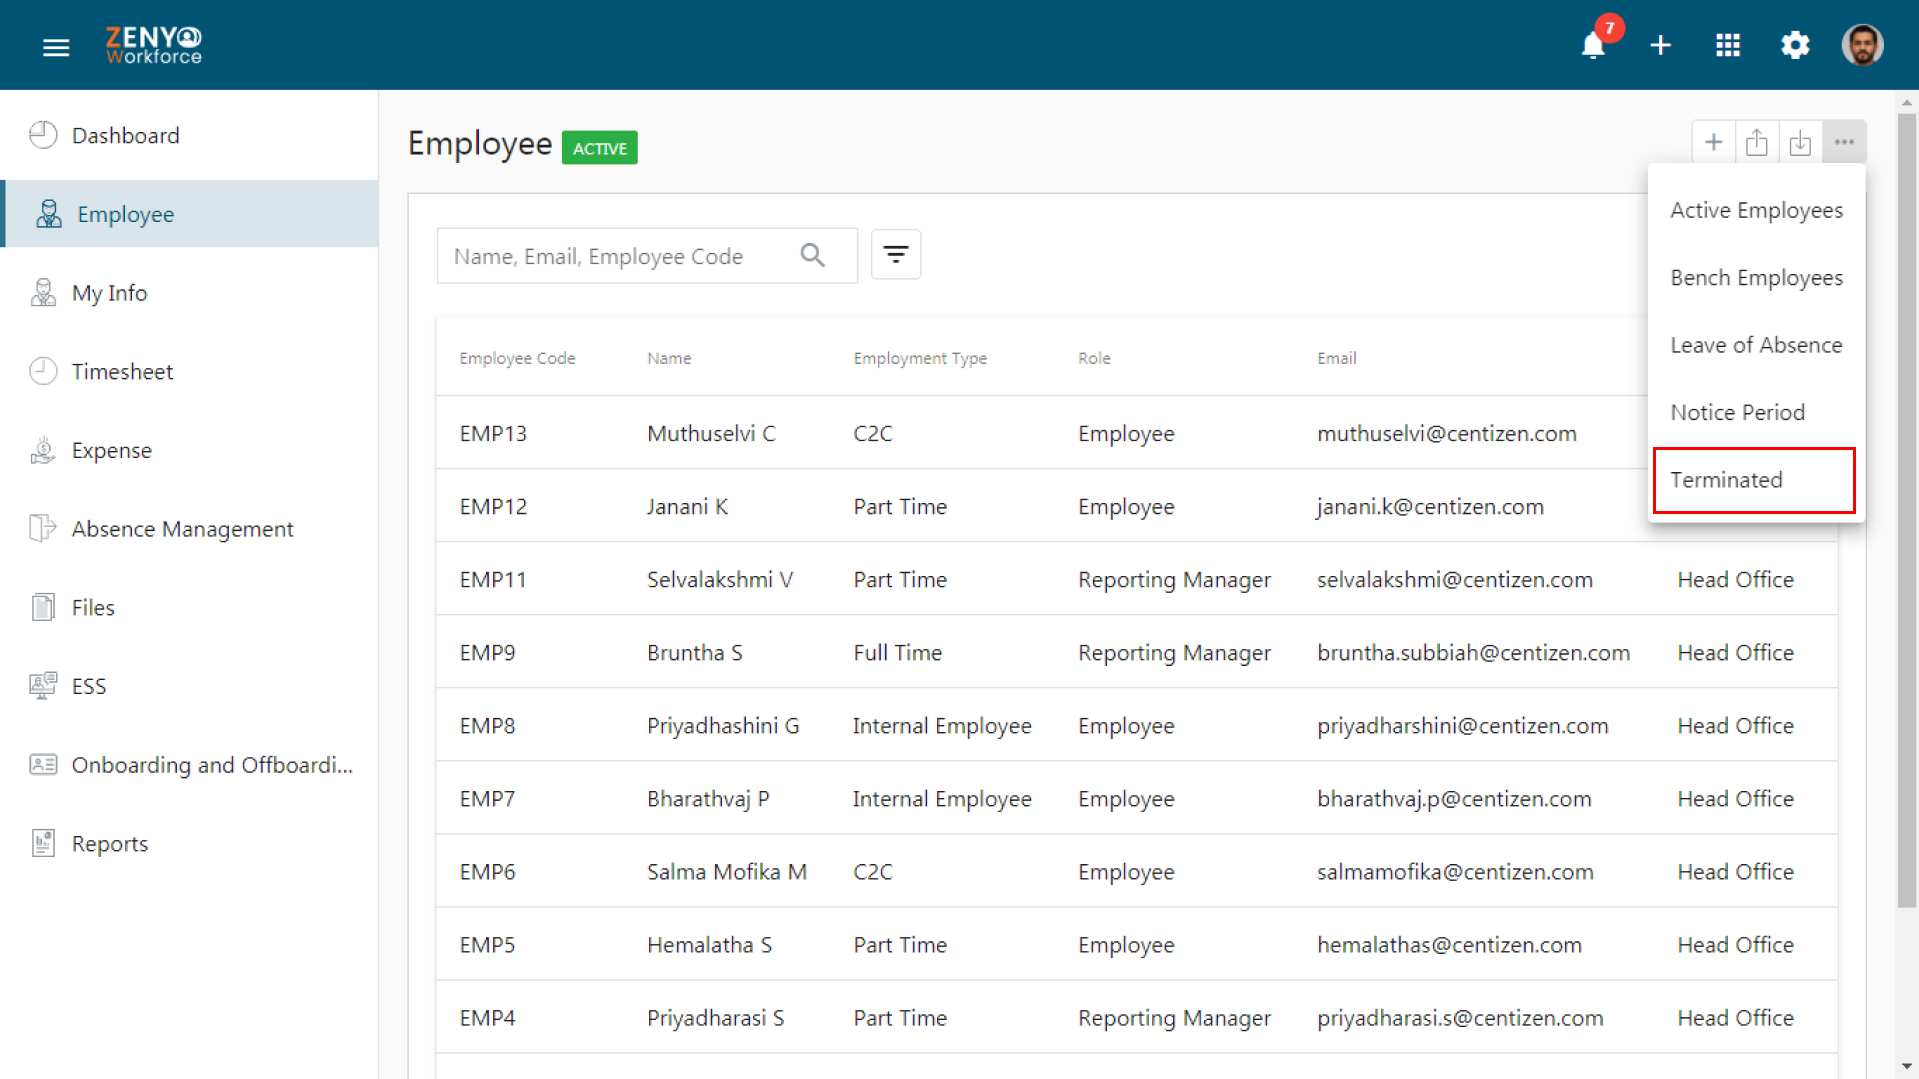
Viewing Terminated Employees
- To view terminated employees, go to the Employee menu, click the More icon, and choose Terminated. Here, the employee’s details along with the termination reason will be displayed. Click the record to know more details about the employee.
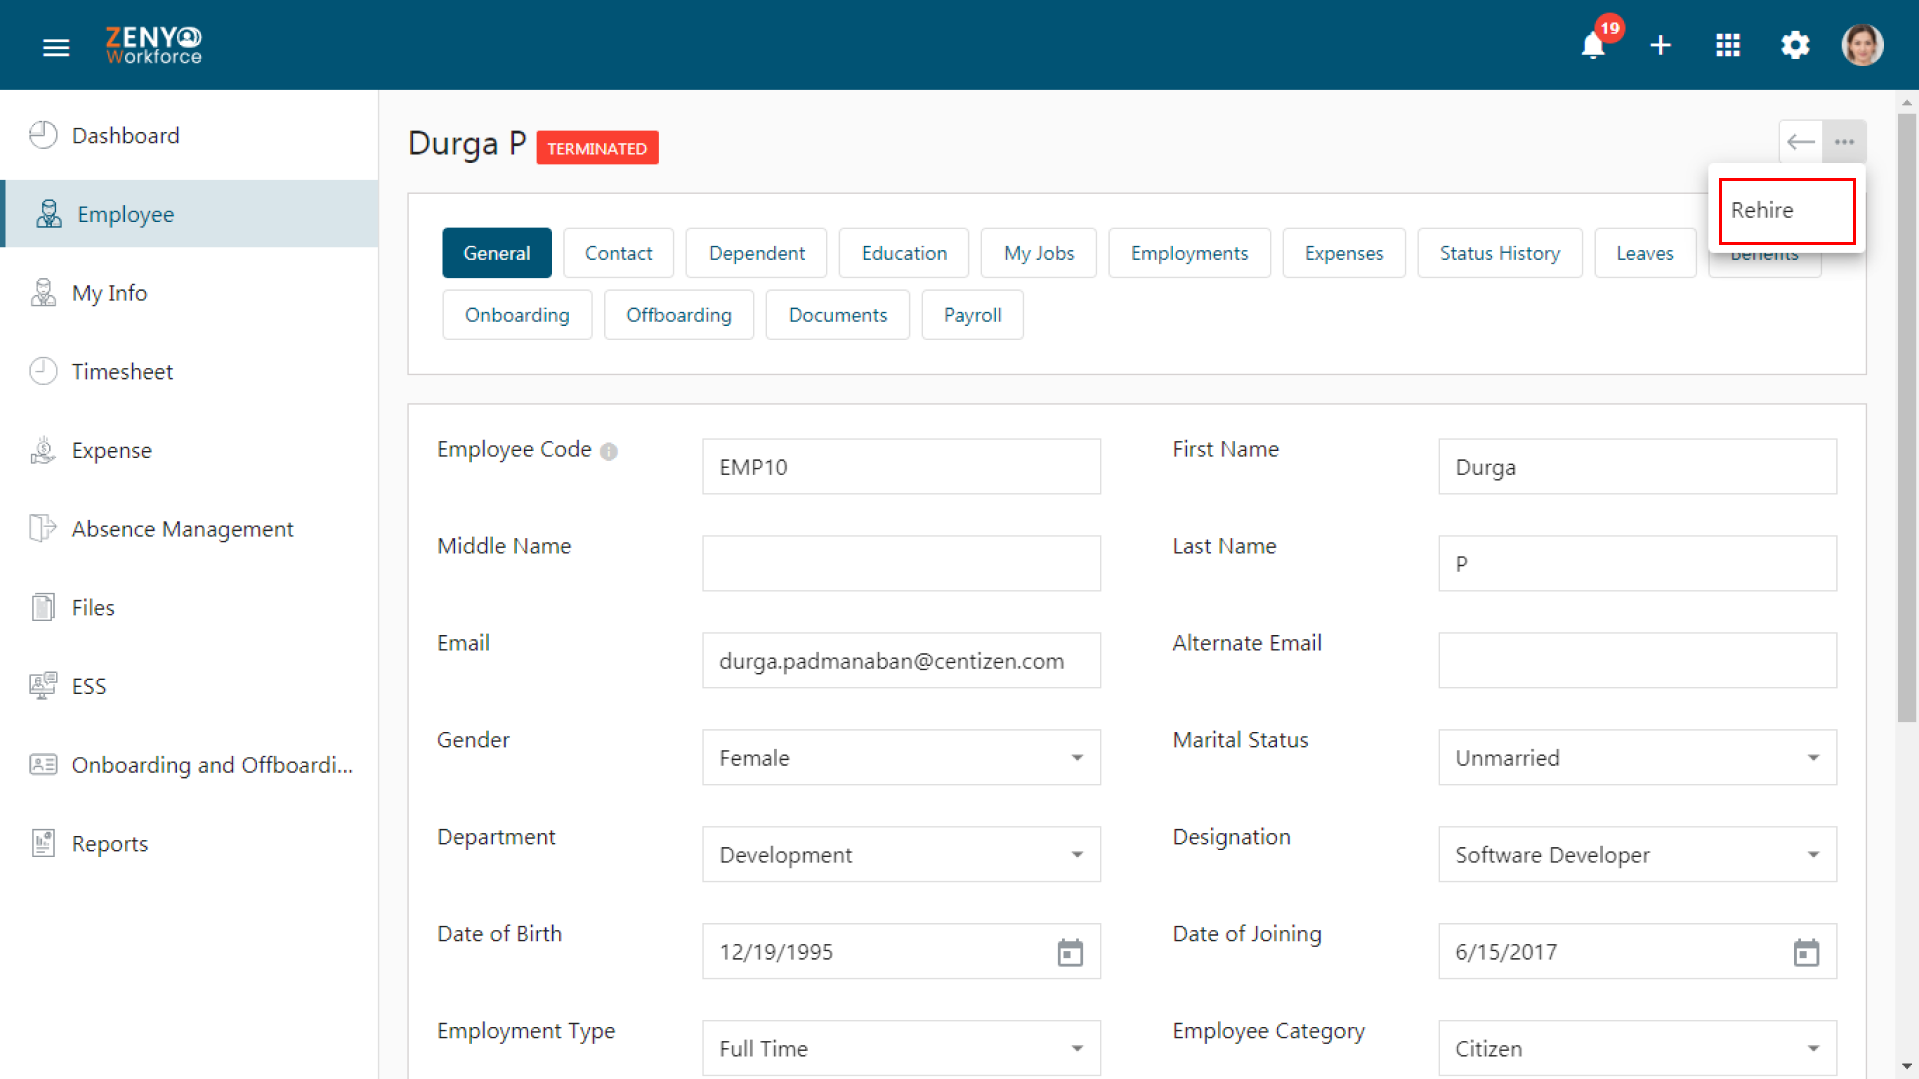
- To rehire an employee, click the More icon on the employee’s information page and select the Rehire option. A dialogue box will appear showing the termination reason. Enter the rehire date and click Save. The employee’s status will then be updated from Terminated to Active.
How to Access All Offboarding Tasks?
- Navigate to the Onboarding and Offboarding menu, where you’ll find the following tabs:
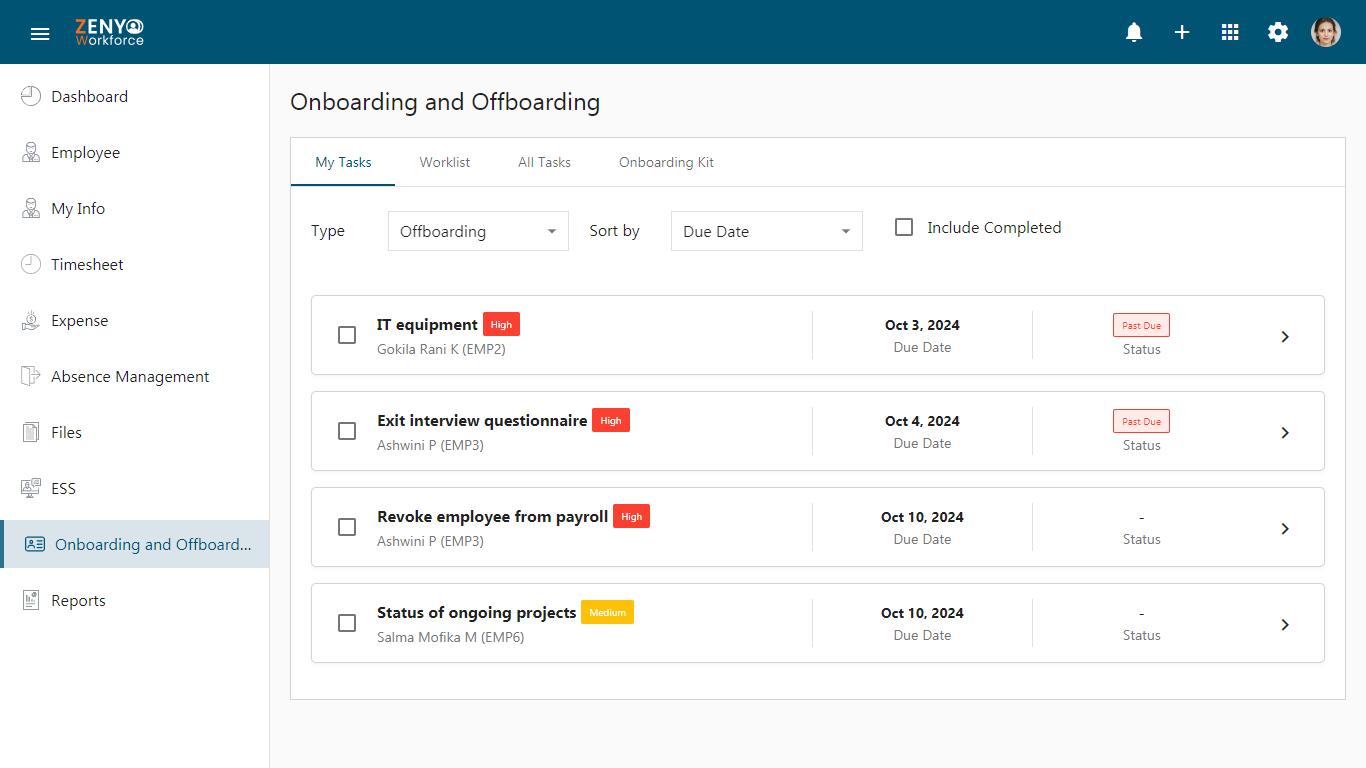
- My Tasks
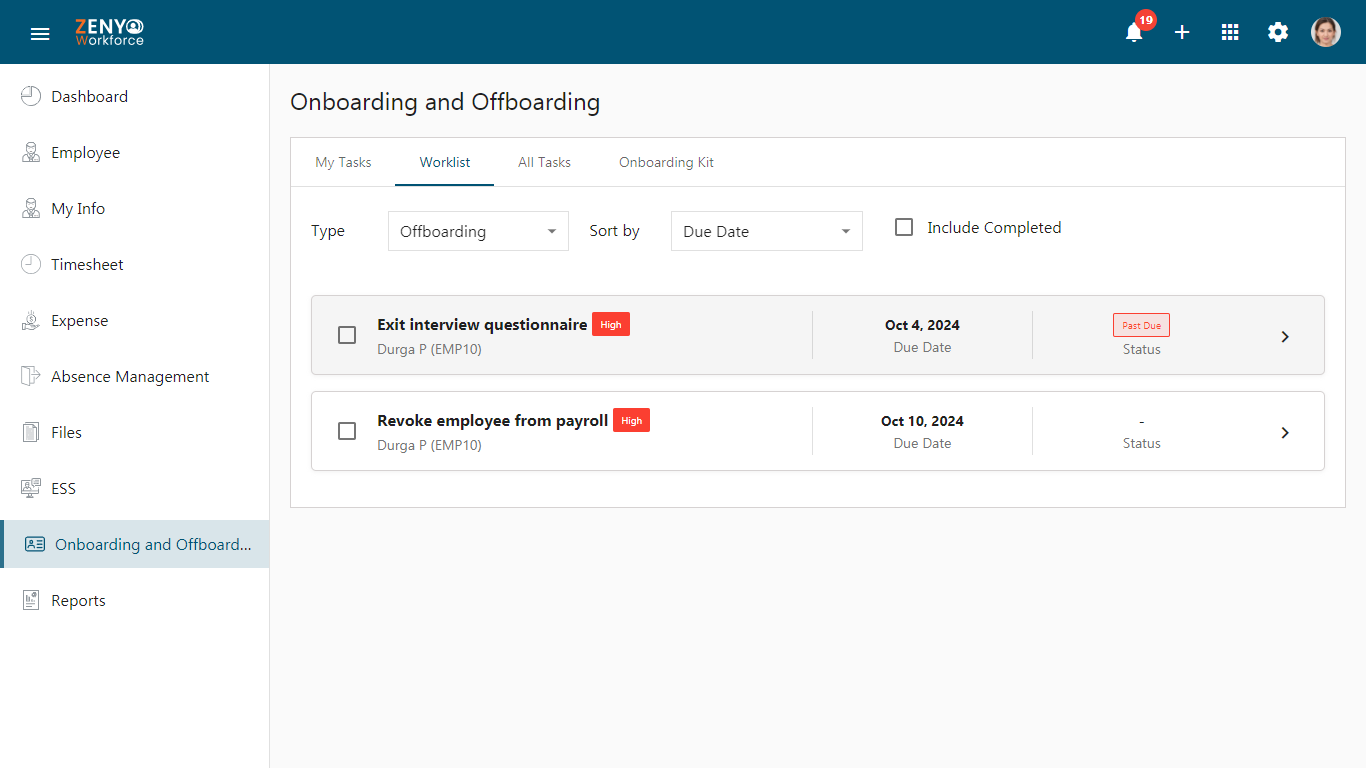
- Worklist
- All Tasks
Note: Make sure the type is set to Offboarding.- My Tasks
- This tab displays all your added and imported tasks, including task names, assignee details, priority status, due dates, and statuses.
- Mark a task as complete by checking the box near the task name.
- Sort tasks by due date or task name. Use the Include Completed checkbox to show completed tasks.
- Clicking the task record will open a side panel showing the employee’s name, designation, priority level, and status.
- You can mark the task as complete by checking the box next to the task name. Documents attached to the task can be downloaded by clicking the Download icon, if available.
- Add comments and upload relevant documents by clicking the Attachment icon. After adding, click Submit.
- Worklist
- Displays all tasks assigned to you, along with the employee name, employee code, priority level, due date, and status.
- Mark a task as complete by checking the box near the task name.
- Sort tasks by due date, employee, or task name. Use the Include Completed checkbox to show completed tasks.
- Clicking the task record will open a side panel showing the employee’s name, designation, priority level, and status.
- You can mark the task as complete by checking the box next to the task name. Documents attached to the task can be downloaded by clicking the Download icon, if available.
- Add comments and upload relevant documents by clicking the Attachment icon. After adding, click Submit.
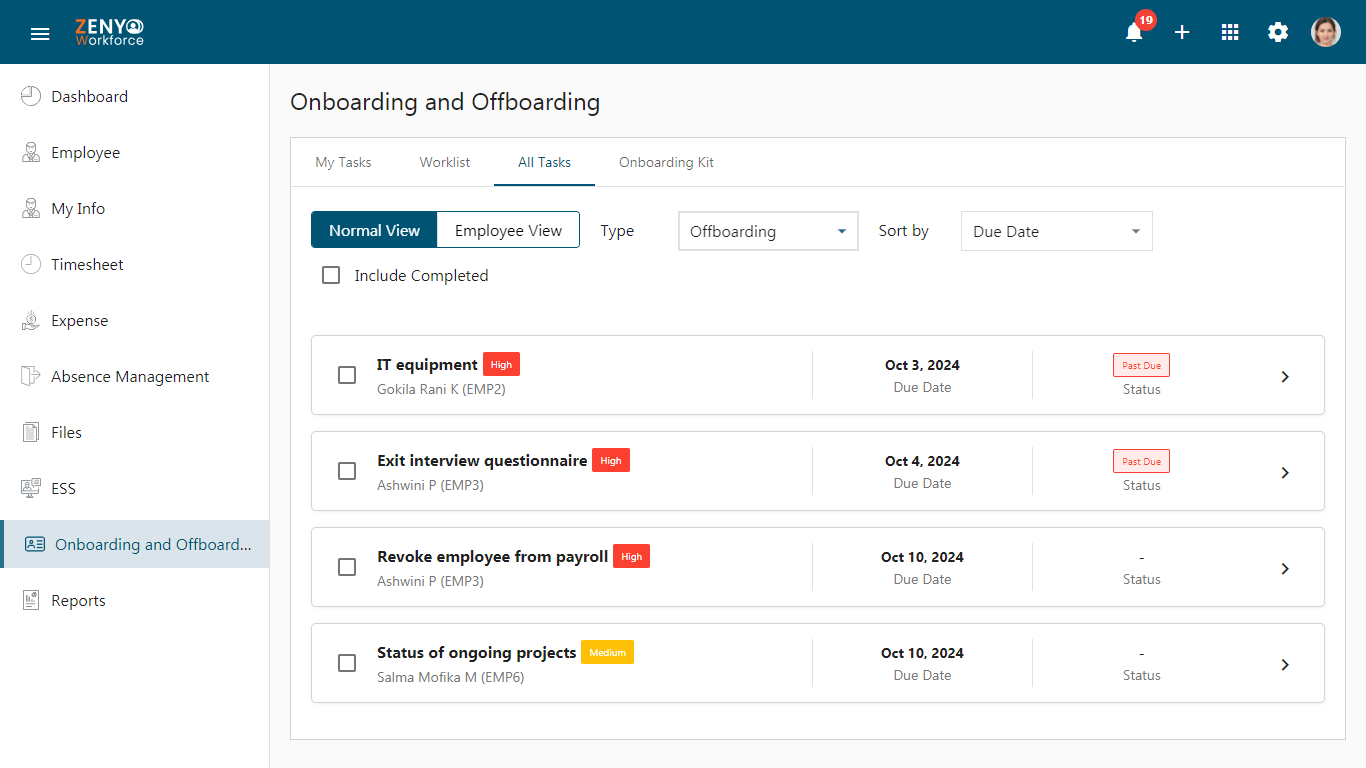
- All Tasks
- This tab shows all tasks imported during the offboarding process.
- Normal View: Displays all tasks assigned to each employee with task names, priorities, and due dates.
- Employee View: Displays tasks grouped by each employee.
- Mark a task as complete by checking the box near the task name.
- Sort tasks by due date, employee, or task name. Use the Include Completed checkbox to show completed tasks.
- Clicking the task record will open a side panel showing the employee’s name, designation, priority level, and status.
- You can mark the task as complete by checking the box next to the task name. Documents attached to the task can be downloaded by clicking the Download icon, if available.
- Add comments and upload relevant documents by clicking the Attachment icon. After adding, click Submit.