Overtime pay is the additional compensation provided to employees for hours worked beyond their standard work schedule. This compensation is essential for ensuring fair remuneration for employees who contribute extra time to their work responsibilities. Effective management of overtime pay not only enhances employee morale and satisfaction but also helps organizations comply with labor regulations, promoting a fair and equitable workplace environment.
Overtime Settings
- Go to Settings and click the Timesheet menu.
Note: For instructions on how to enable timesheets for an employee, follow this link.
- Select Overtime Settings.
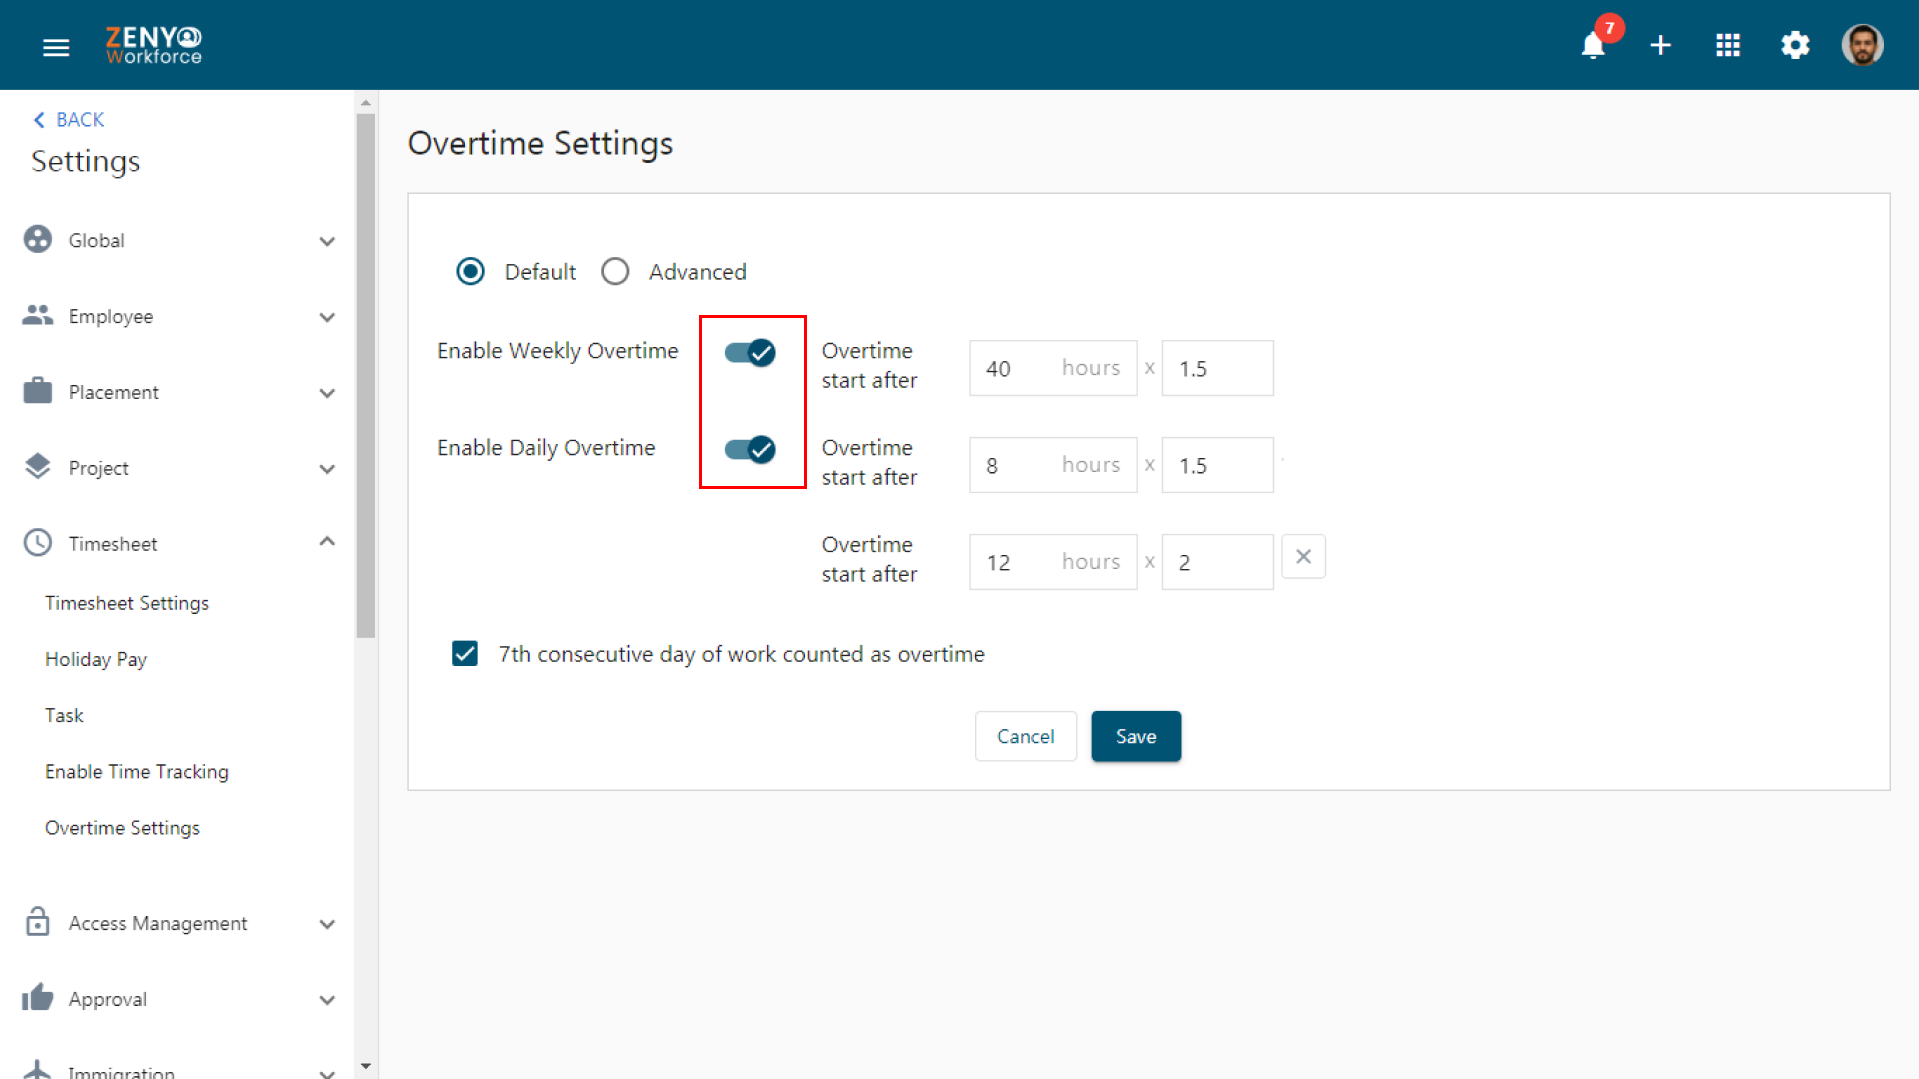
- There are two levels for setting up overtime pay: Default and Advanced.
- The Default level applies the same overtime rules to all employees. You can configure overtime pay on either a weekly or daily basis, or both.
Weekly Overtime
- Enable the toggle for Weekly Overtime.
- Set the threshold by entering the number of hours beyond which work will be considered overtime.
- Specify the overtime rate.
- Example: If the threshold is set to 40 hours and the rate is 1.5x, any hours worked beyond 40 in a week will be paid at 1.5 times the employee’s regular hourly rate.
Daily Overtime
- Enable the toggle for Daily Overtime.
- Set the threshold for daily overtime hours.
- Enter the overtime rate.
- You can also set a double overtime threshold for employees who work additional hours by clicking the Add icon.
- Example: If an employee works 14 hours in a day, hours between 8 and 12 are paid at 1.5 times the normal rate, while hours beyond 12 are paid at double the rate.
Seventh-Day Overtime
- Check the box to enable overtime pay for working on the seventh day of the week.
- You can enable both Weekly and Daily Overtime to manage and compensate employees based on weekly and daily overtime.
- If you need to customize overtime settings based on specific office locations, go for the Advanced level.
- Select the Advanced option.
- Choose the office Location.
- Configure overtime settings for each location separately.
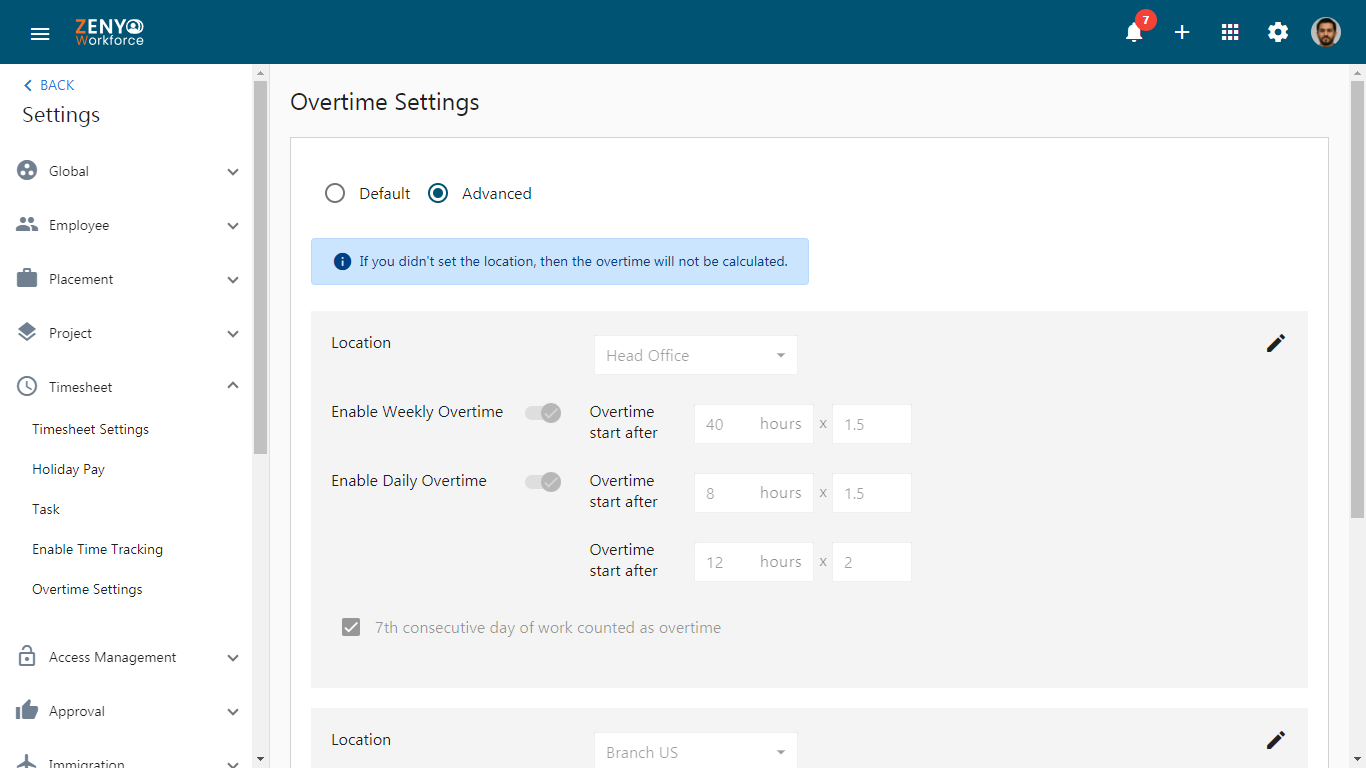
- After configuring the settings at either the Default or Advanced level, click Save to apply them.
Apply Overtime Pay to Employees
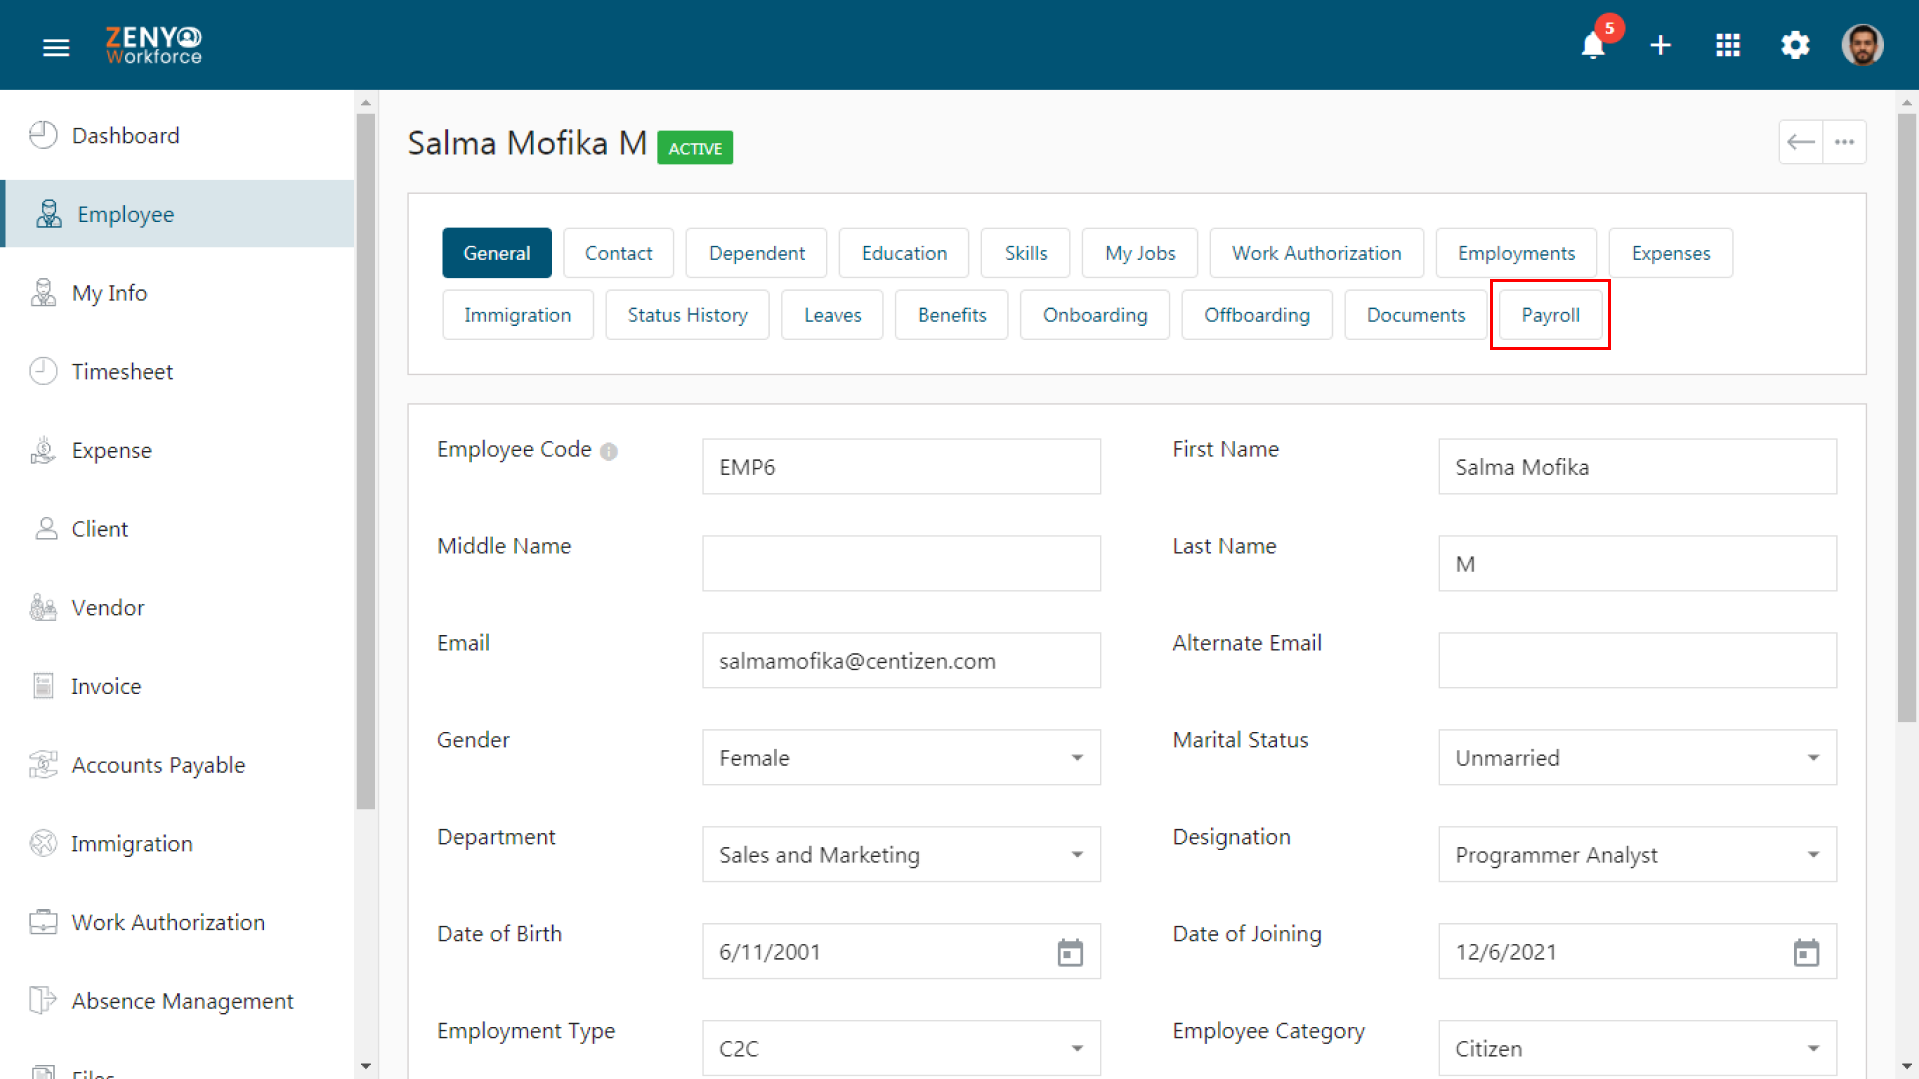
- To make overtime pay applicable to employees, you will need to configure the relevant settings in their Payroll Details.
- Click on the Employee main menu.
- On the Employee page, choose the employee for whom you want to assign overtime pay.
- Under the Payroll tab, click the edit icon to begin editing the employee’s payroll details.
- Ensure the Pay Type is set to Hourly.
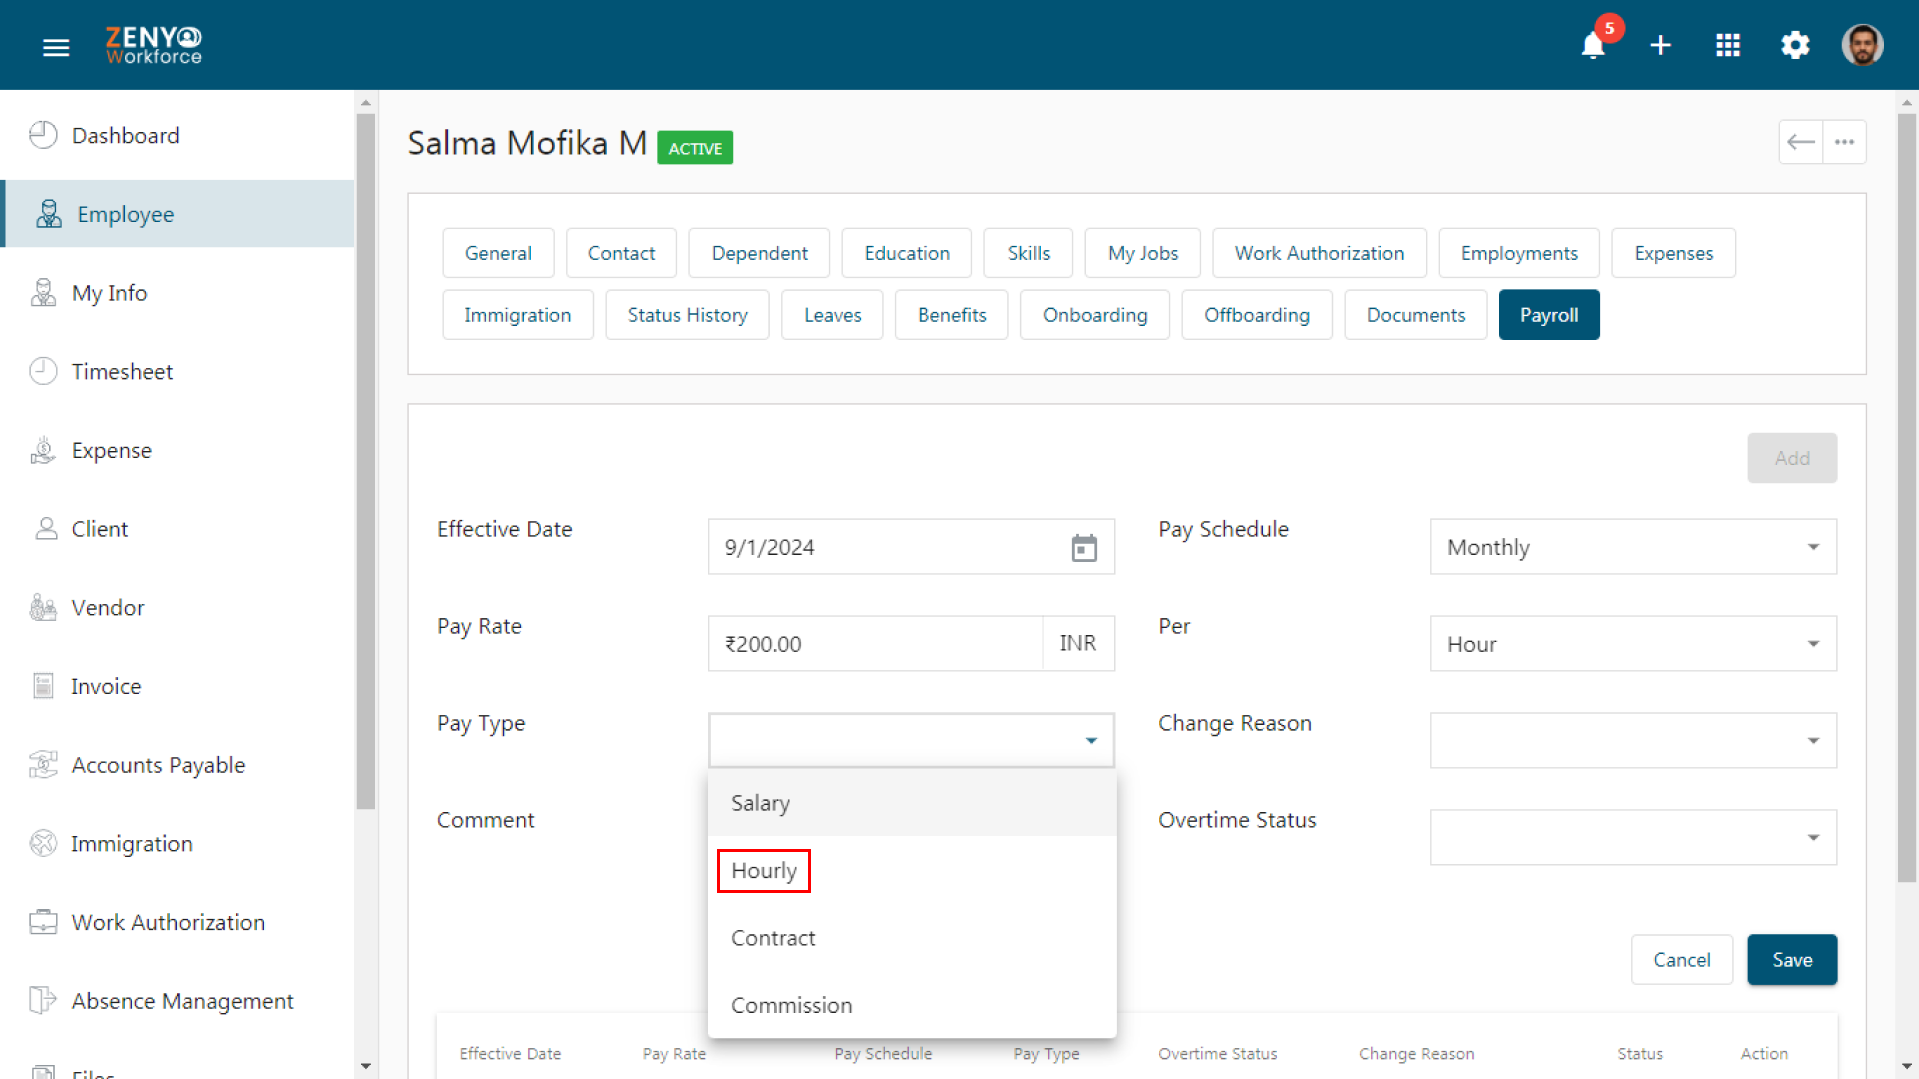
- Change the Overtime Status to Non-Exempt.

- Once done, click the Update button to save the changes.
Timesheet Entry for Overtime Pay
- Once timesheets are enabled and the overtime pay is set for an employee, they can begin submitting their entries.
- Here’s how employees can log their timesheets from their profiles.
- From the home page of the employee profile, navigate to Timesheet in the main menu.
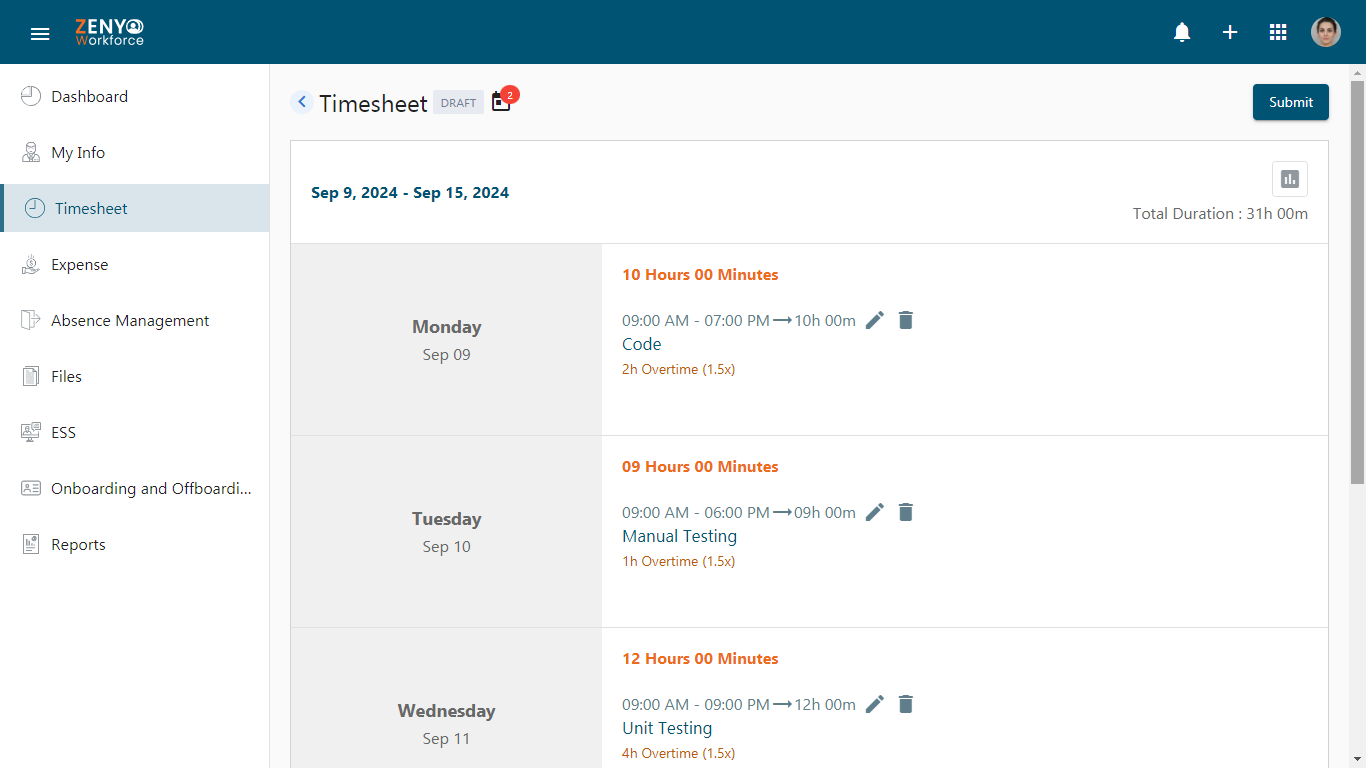
- On the Timesheet page, click the Add icon to open the Timesheet entry page.
- Click on the +Add Time Entry link for the desired day. A pop-up box will appear where they can enter details for the time entry.
- Choose the relevant project from the dropdown list.
Note: Projects will only appear if the employee has been assigned to a project.
- Select the specific task associated with that project.
- Specify the Start Time and End Time for the task.
- Provide a detailed description of the work completed.
- If needed, attach files to give further context to the entry. Once all details are complete, click Save to log the entry.
- Once overtime pay is set for an employee, the system will automatically display the Overtime Pay after the timesheet entries exceed the normal 8 hours of work.
- For example,
- 8 hours logged: These are standard working hours, so no overtime applies.
- 14 hours logged: The first 8 hours are at regular pay, the next 4 hours are paid at 1.5 times the regular pay (overtime), and the final 2 hours are paid at twice the regular pay (double overtime).
- If overtime is enabled for the 7th day of the week, any hours worked (up to 8 hours) will be compensated at 1.5 times the normal pay as overtime.
- Employees can add entries for multiple tasks on the same day, ensuring that the times for each task do not overlap.
Once all entries for the selected week are completed, employees can submit their timesheets for approval by clicking the Submit button.
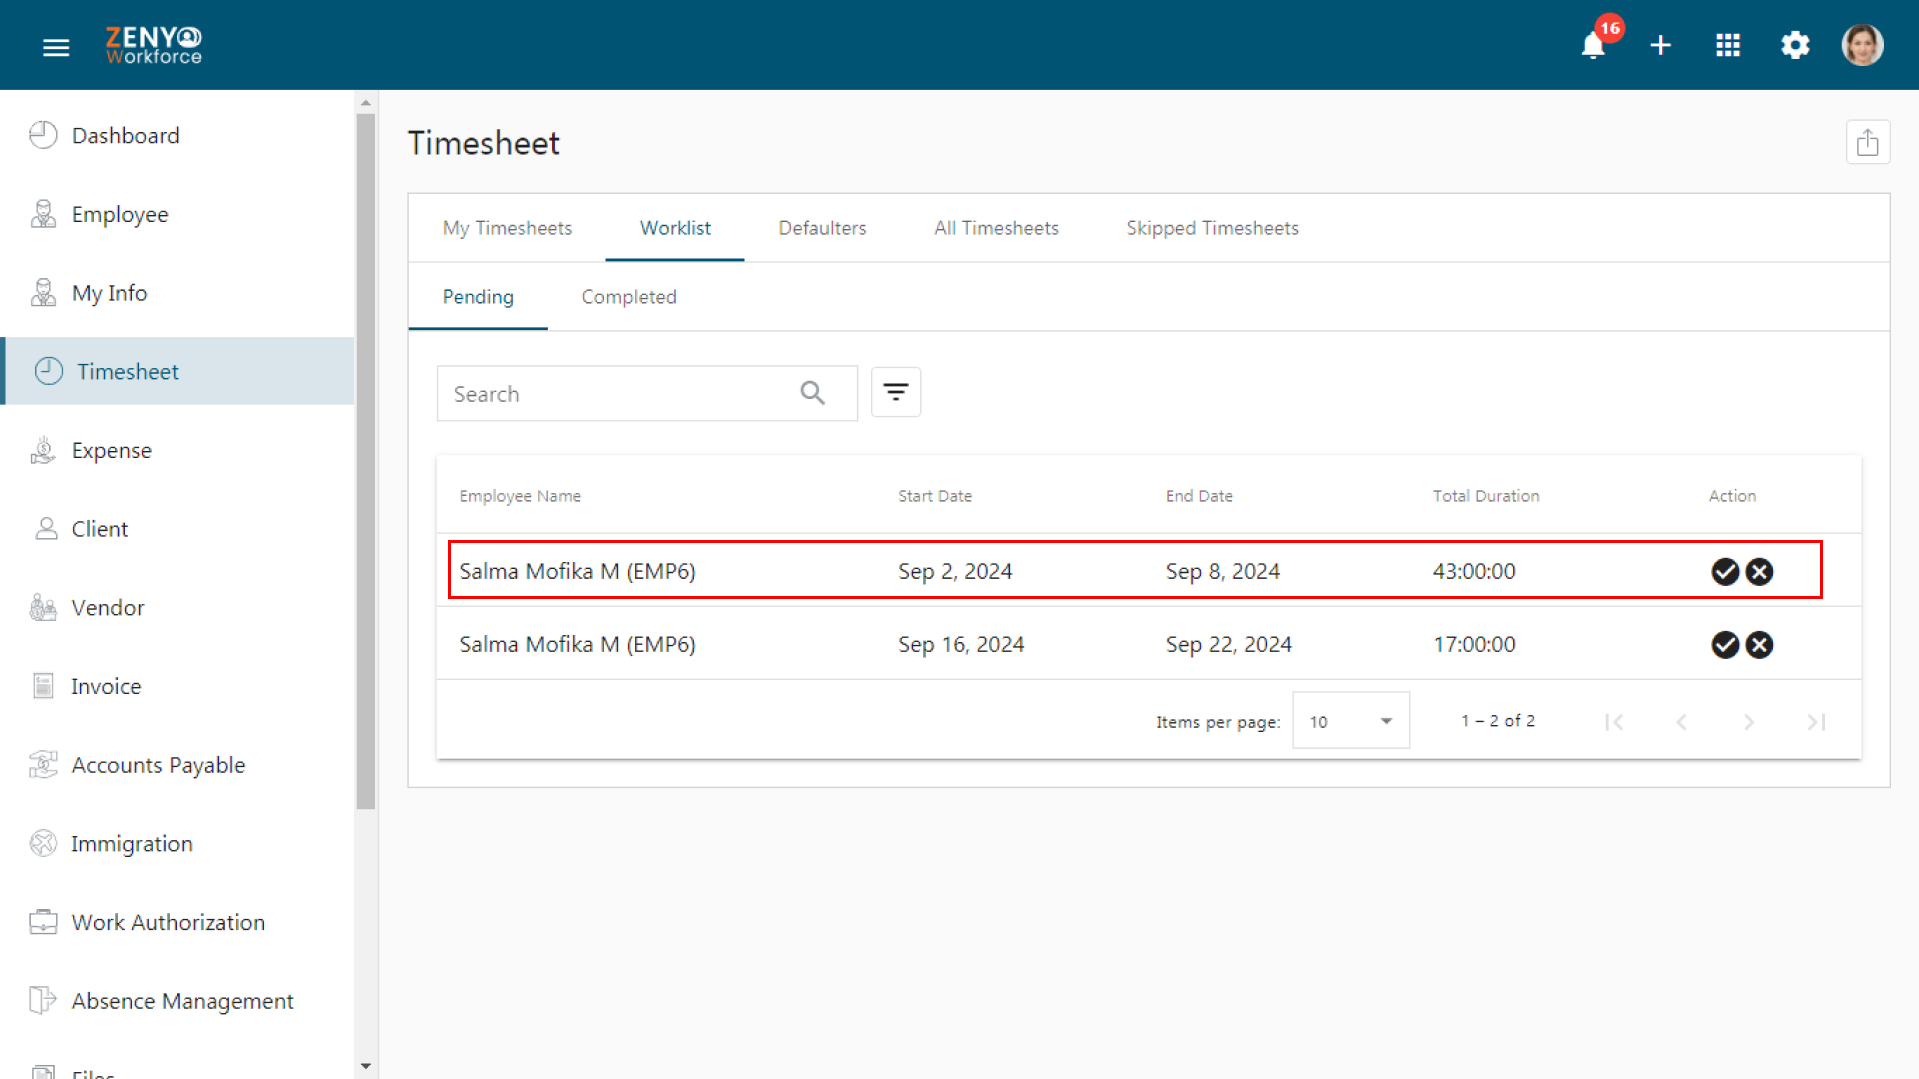
How To Approve the Submitted Timesheets[Worklist Tab]
- Timesheet approvals can only be processed by accounts assigned as Timesheet Approvers.
Note: No individual, including approvers, can approve their own timesheets.
- From an approver account, click Timesheet in the main menu to go to the Timesheet page.
- Select the Worklist tab.
- Under the Pending tab, you will see a list of submitted timesheets awaiting approval.
- To approve a specific timesheet, click the Approve icon.
- To reject a submission, click the Reject icon.
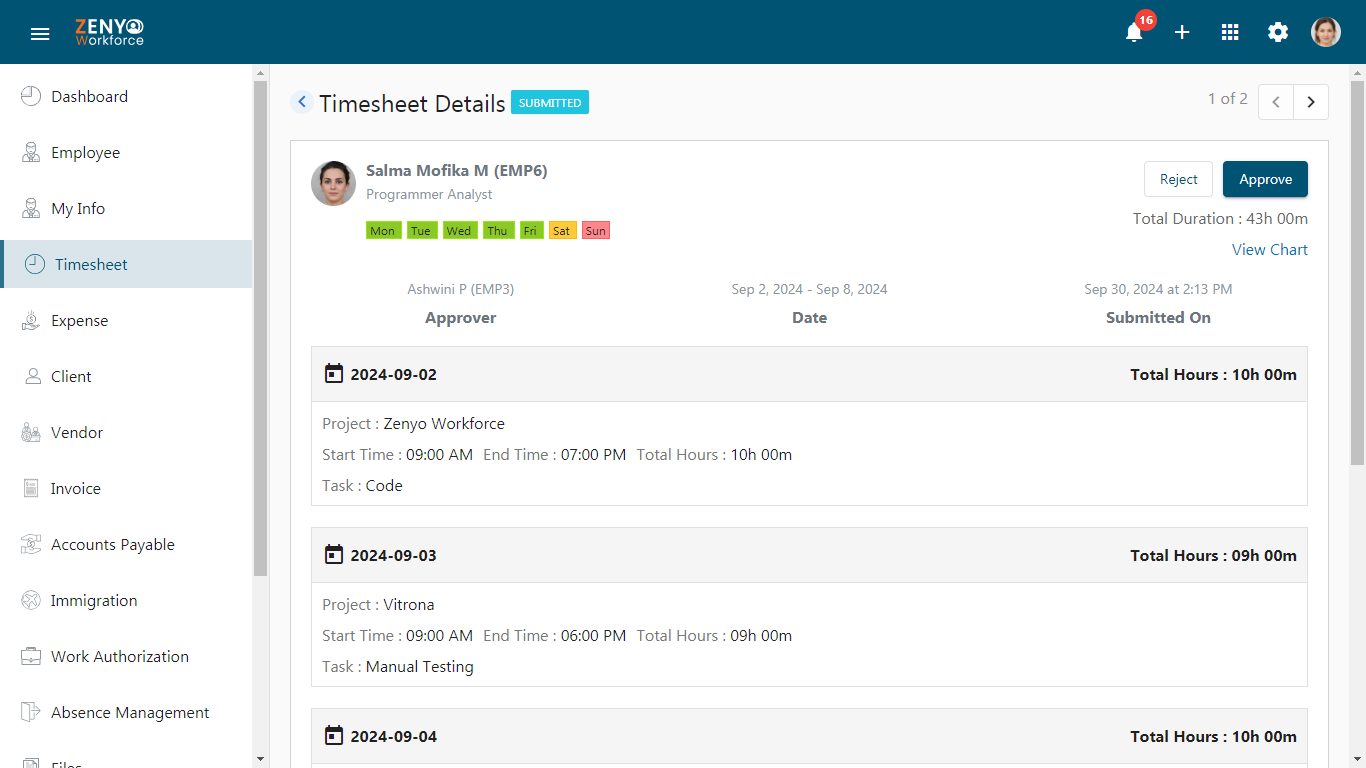
- When you click Approve, a pop-up will appear with two options: Review Details or Proceed.
- Click Proceed to approve the timesheet instantly.
- If you want to review the details before approving, click Review Details. You will be redirected to the timesheet details page, where you can approve or reject the timesheet. Click Approve on this page to finalize the approval.
- Under the Completed tab, you’ll find approved or rejected timesheets along with their status.
- In both tabs, you can search for a specific timesheet or utilize the filter options to refine your search.
